

Oh, autumn! Nothing makes me happier than when the air just starts to get that crisp edge, telling me it’s officially time to pull out the pastry flour. While I adore a deep-dish classic, sometimes you want something that looks effortlessly elegant but tastes like pure comfort, right? Well, this recipe is my answer: the most spectacular Salted Caramel Apple Tart you’ll ever make, complete with that gorgeous, woven lattice top.
When I was a kid, autumn meant one thing in our house: the smell of apples simmering in butter on the stove. My mom made tarts often, but the first time we drizzled warm salted caramel over the top felt almost magical. I remember standing on my tiptoes, spoon in hand, trying to get the caramel to cascade in perfect ribbons. It never looked perfect—but it tasted perfect every time. That memory still comes back to me whenever I bake with apples, reminding me that the joy of baking isn’t in perfection, but in the moments it creates.
Why This Salted Caramel Apple Tart is Your New Favorite Dessert
Honestly, what isn’t there to love? I think this tart hits every major dessert note perfectly, which is why I’m already planning when I can bake another one. You just can’t go wrong with this combination!
- You get that perfect push-pull between the tartness of the apples and that deep, rich, salty-sweet caramel. It’s addictive!
- The crust is flaky and buttery, basically the perfect vessel for all that gooey goodness inside. Seriously, use your favorite recipe, but make sure it chills well.
- And let’s be real, the lattice top makes it look like you spent days in the kitchen. It’s show-stopping without needing any fancy pastry skills. Make sure to check out my other favorite holiday bakes while you’re here, but this one is a real showstopper!
Gathering Ingredients for the Salted Caramel Apple Tart
Okay, before we dive into the weaving and the baking frenzy, we need our supporting cast! A great tart starts long before it hits the oven; it starts with having everything ready. Trust me, trying to measure flour while your butter is melting on the counter is never a good time. We’re going to break this down into three manageable parts so you can shop or organize your pantry stress-free. And don’t forget to check out some other apple goodness for breakfast later!
Pie Crust Components
Since we are focusing on the incredible filling, I’m assuming you already have your favorite double-crust pie dough recipe handy! We need enough dough for the bottom shell and the lattice top. Make sure you have that dough chilled for at least two hours before you even think about rolling it out. Cold dough means flaky crust, and that’s non-negotiable for this showstopper!
Apple Filling Ingredients
This is where the magic happens, folks. You need volume here, so don’t skimp on the fruit! We are tossing these apples with sugar, spices, and a little flour to make sure that filling sets up nicely.
- You’ll want 10 cups of apple slices, which comes out to about 8 really large apples once they are peeled and cored, sliced nice and thin at 1/4-inch-thick.
- We need 1/2 cup of granulated sugar.
- A splash of 1 Tablespoon of fresh lemon juice brightens everything up!
- For thickening, grab 1/4 cup of all-purpose flour—make sure you spoon and level that measurement!
- For that classic warm flavor, toss in 1.5 teaspoons of ground cinnamon, plus 1/4 teaspoon each of ground allspice (or use ground cloves if you prefer that sharp note) and ground nutmeg.
- And the star linking it all together—use 1 cup of salted caramel sauce; we use half now and save the rest!
Assembly and Finishing Touches
These little details are what make the tart truly shine when it comes out of the oven. A little gloss and a little extra saltiness never hurt anyone!
- You’ll need 1 large egg beaten together with 1 Tablespoon of milk for your egg wash. This gives us that beautiful golden color.
- If you like a little crunch on top, grab some coarse sugar, but this part is totally optional!
- Remember that remaining 1/2 cup of salted caramel sauce? Save that—it’s the grand finale drizzle after the tart has cooled slightly.
Step-by-Step Instructions for Your Salted Caramel Apple Tart
Okay, this is where the real fun begins! Making a lattice crust always feels a little intimidating, but trust me, it’s just weaving, and you can do it! We need to be mindful of temperature and time here, especially with the dough, to guarantee that gorgeous flaky crust. If you’ve ever struggled with a runny pie filling, these techniques will save your tart! And hey, if you’re looking for pastry inspiration later, maybe see how some pro bakers handle their dough; it often gives me great ideas for lattice weaving.
Preparing the Dough and Caramel Base
First things first: If you made your dough yesterday, great! If you haven’t, stop what you are doing and chill it now. We need that pie dough really cold, which means a minimum of 2 hours chilling time before we even try to roll it out. If you’re making homemade salted caramel sauce, this is also the time to get that done so it has a chance to cool down properly. You can’t pour hot caramel onto cold pastry, or you’ll have a sad, melty disaster on your hands!
Mixing the Apple Filling
Once the dough is chilling happily, grab that big bowl and let’s get those apples tossed. You want to combine your 10 cups of apple slices carefully with the sugar, lemon juice, flour, and all those wonderful spices—cinnamon, nutmeg, and allspice. Use a wooden spoon or your hands to mix until every single slice is lightly coated. We want that flour and spice mixture to cling evenly; even distribution here means no dry, unseasoned apples hiding in the corner!
Assembling the Tart Base and Filling
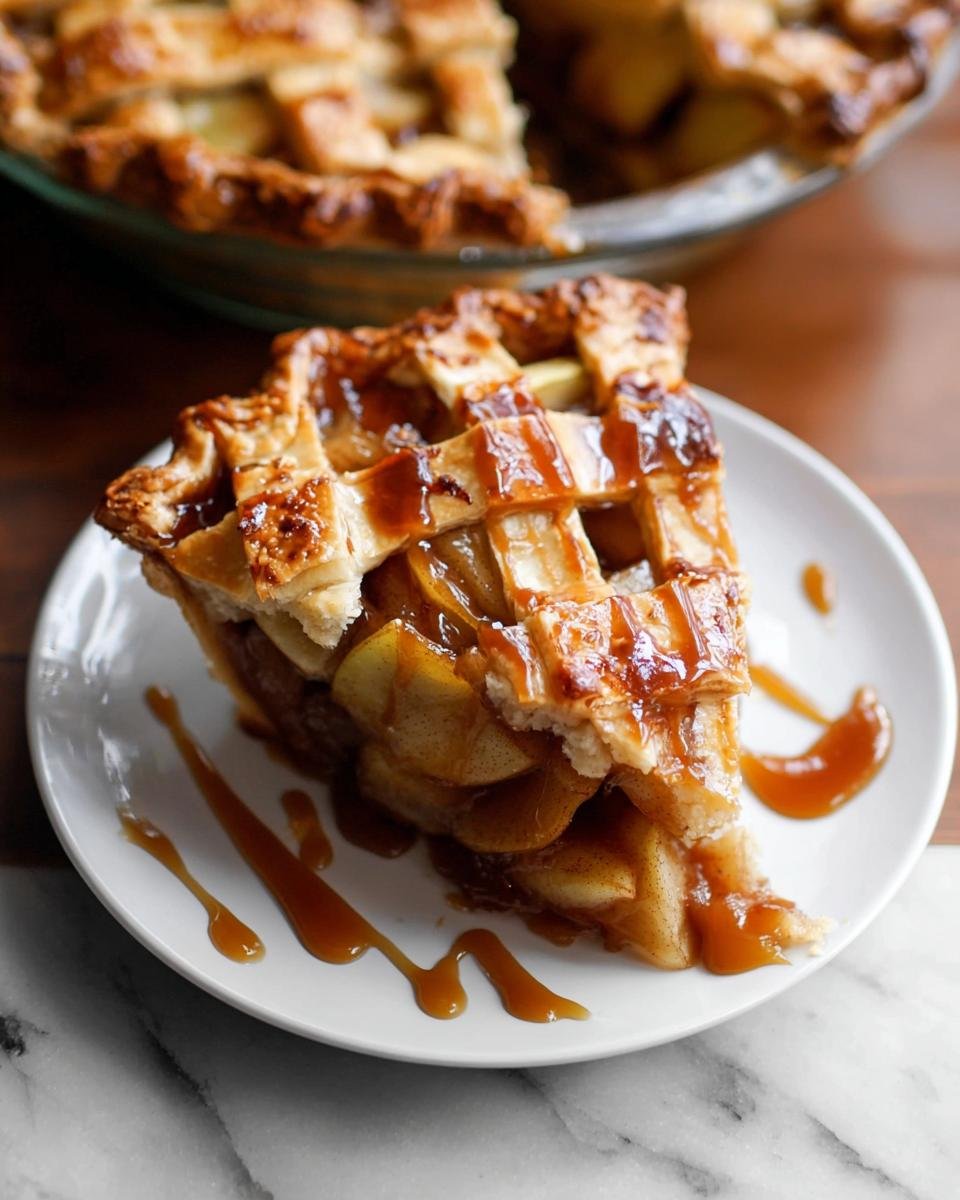
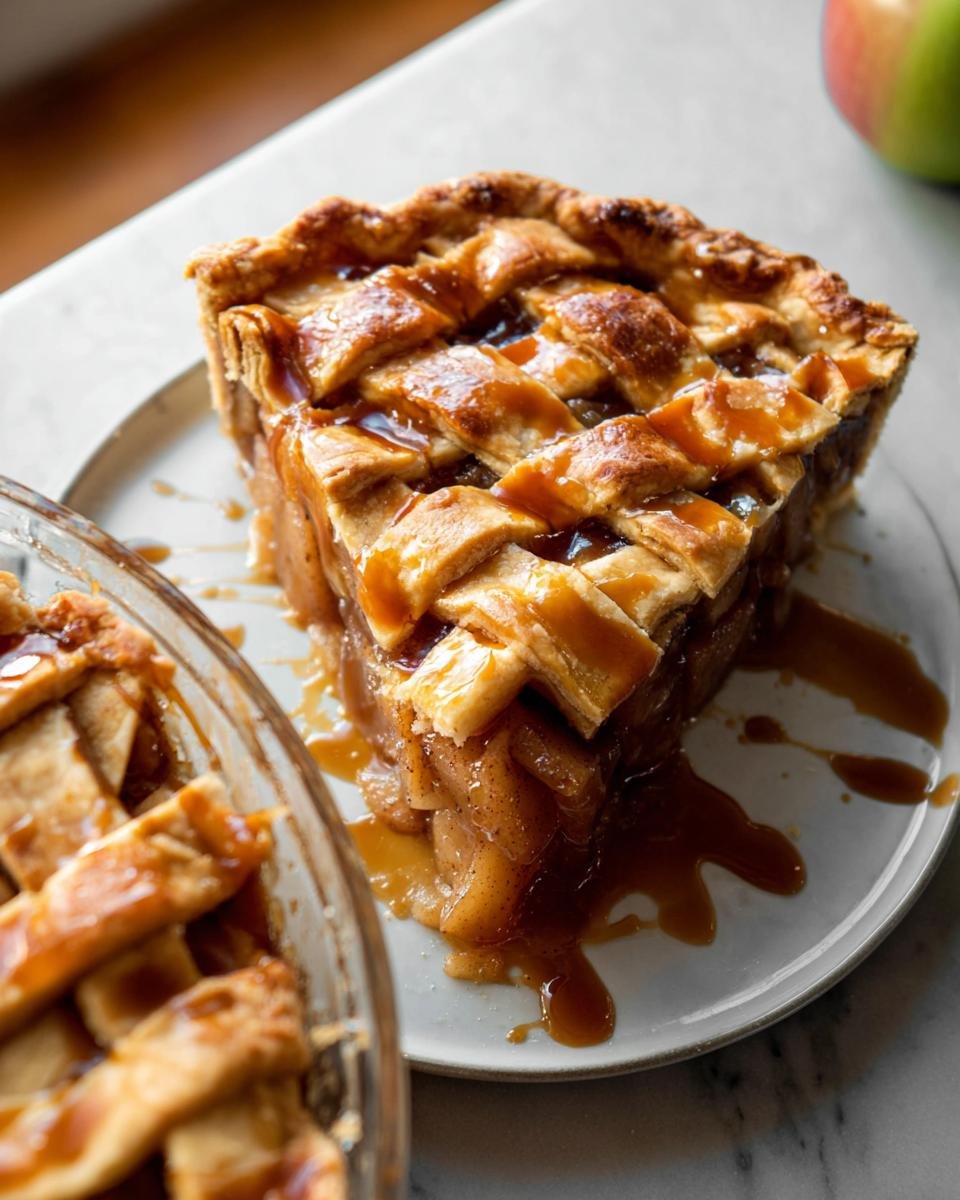
Time to roll out the first disc! Dust your counter lightly, and roll that dough into a nice 12-inch circle. Carefully ease it into your 9-inch pie dish—don’t stretch it, or it’ll shrink back later. Now, take those beautifully spiced apples and pile them high into that crust. Seriously, pile them up like little mountains! Once they are settled, take about half a cup of your cooled salted caramel sauce and drizzle that right over the apples. That’s the sweet, salty layer that sets the whole tart apart.

Creating and Applying the Lattice Crust
Take your second dough disc and roll it bigger, maybe 13 or 14 inches. Using a pastry wheel, cut strips that are between 1/2-inch and 3/4-inch wide—consistency matters here for a neat weave. Weave those strips over and under the apples. It’s easier than you think! Once woven, trim the edges, fold the overhang under, and pinch everything together to seal, fluting the edges prettily. Then, brush the entire top with your egg wash and sprinkle on that optional coarse sugar for sparkle.

Baking and Shielding the Salted Caramel Apple Tart
Put the whole tart onto a baking sheet—this catches drips and makes moving it easier! Preheat your oven to 400°F (204°C) and bake for 25 minutes. Then, you must reduce the heat to 375°F (190°C) and put that pie shield on the edges so they don’t burn. Keep baking for another 35 to 40 minutes. We’re looking for that gorgeous bubbly filling, and the internal temperature should hit about 200°F (93°C) when it’s truly done. If you’re nervous about the edges, you can just tent the whole thing with foil near the end!
Cooling and Final Drizzle
This is the hardest part, but you absolutely must resist cutting into it right away! Get the tart onto a cooling rack. That filling needs to set up. If you slice it warm, you’ll have that beautiful caramel running all over your plate instead of neatly clinging to the apples. You need at least three hours of cooling time—I know, it’s agonizing! Once it’s cooled down nicely, take that remaining 1/2 cup of caramel and drizzle it dramatically over the top, or save it for drizzling on each slice individually. Enjoy!
Tips for the Perfect Salted Caramel Apple Tart
Making this tart absolutely beautiful and delicious comes down to a few little secrets I’ve picked up over the years. It’s not complicated, but these steps make all the difference between a good tart and *the* tart!
First, let’s talk apples. You need apples with some backbone so they don’t turn to mush. I always use a mix—maybe five Granny Smiths for that sharp tartness and five Honeycrisp or Braeburns for sweetness. They hold their shape so much better during that long bake time. For the crust, we need to fight that dreaded soggy bottom! The trick is the initial caramel layer—it seals the bottom crust a bit before the full bake. Also, make sure your bottom crust is perfectly seated and crimped against the dish so no filling seeps down to the very bottom layer. If you are loving apple flavor, you should check out my apple cinnamon pancake recipe for the morning after!
Ingredient Notes and Substitutions for Your Tart
This recipe has a few places where folks might get stuck or wonder if they can switch things up. I want to clear those up right now so you feel totally confident heading into the kitchen! Remember, baking is more about feeling than rigid rules, but for the structure of this tart, some choices are just better than others.
Let’s start with those apples, because 10 cups sounds like a lot! You absolutely need a firm, tart apple to balance that thick, sweet caramel. I always lean heavily on Granny Smith apples because they just refuse to break down into sauce. If you find them too tart on their own, mix them half-and-half with something sweeter and firmer, like Honeycrisp or maybe even a Gala. Granny Smith is the backbone here, though; don’t skip them entirely!
Next up, we talked about the spices. In the filling, I listed cinnamon, nutmeg, and then “allspice OR ground cloves.” This is a genuine substitution because some spice cabinets just don’t stock both! Allspice tastes like a blend of cinnamon, nutmeg, and cloves already, so it’s a perfect stand-in. If you use cloves instead, be careful—cloves are very potent. Only use that 1/4 teaspoon, and don’t be tempted to add more, or you’ll overpower that beautiful apple flavor.
Finally, if you’re making your own salted caramel sauce (which I highly encourage!), the texture when you start assembling matters. You want it cool enough that it doesn’t melt the raw pastry dough when you drizzle it over the apples. It should be pourable, but thick, almost like honey straight out of the jar after it’s completely cooled. If you accidentally made yours too thin, just let it chill in the fridge for ten minutes before using that first cup over the apples.
Storing Your Delicious Salted Caramel Apple Tart
You made a masterpiece! Congratulations on finishing this incredible Salted Caramel Apple Tart. Now, the big question: how do we keep it tasting just as amazing tomorrow as it does today? Leftovers are the best, but we want to protect that flaky crust and all that gooey caramel.
The good news is that because caramel helps preserve the filling a bit, this tart is surprisingly sturdy. We have two main options for storage, depending on how long you need to keep it.
For short-term storage—say, you know you’ll be eating the rest within 24 hours—you can totally keep the tart right on the counter. Just cover it loosely with foil or beeswax wrap. Room temperature is fine for up to one day. Keep it away from direct sunlight or heat, of course. The crust tends to stay a bit flakier this way initially.
If you have ambitious plans to keep this tart around for several days, you need to move it to the fridge. Cover it up snugly, and it should keep well for about five days. Just be warned: the crust might soften a little once refrigerated because of the moisture change. Don’t worry, though; we have a perfect fix for that!
When you pull a slice out of the cold, I highly recommend giving it a quick warm-up to bring back that fresh-baked glory, especially if you’ve refrigerated it. Pop a slice on a small baking sheet at about 350°F (175°C) for just about 8 to 10 minutes. This hits the apples with enough heat to soften them slightly and, vitally, crisps the bottom crust right back up! If you’re feeling extra fancy, you can drizzle that remaining salted caramel right over the warmed slice. We’re planning another savory bake soon, so check out my crockpot chicken pot pie recipe for a completely different type of comforting leftover!
Serving Suggestions for the Salted Caramel Apple Tart
Honestly, eating this Salted Caramel Apple Tart all by itself is fantastic—it’s rich enough to stand on its own. But since we put so much love into making that lattice perfect and getting that caramel just right, why wouldn’t we serve it with something that takes it totally over the top?
I believe dessert should be an experience, and that usually means adding creaminess and temperature contrast. Trust me, adding just one of these simple sides elevates this tart from a holiday hit to an absolute showstopper.
The Classic Vanilla Scoop
You can never, ever go wrong with vanilla ice cream. It’s the best friend of almost any fruit dessert, but it especially loves apples and caramel. The cold, creamy vanilla melts beautifully over that warm slice, blending with the salted caramel drizzle you put on top. If you use a really good quality vanilla bean ice cream, you get those tiny specks of vanilla bean that just look so gourmet.
Sometimes plain vanilla feels a little pedestrian, so if you want to shake it up slightly, try using a high-quality French vanilla or maybe even a maple-flavored ice cream if you have some on hand. Maple and apple are just a match made in heaven, you know?
Fluffy Whipped Cream
If you want less temperature contrast and more soft texture, homemade whipped cream (lightly sweetened, please!) is the way to go. The lightness of the fresh cream cuts through the intense sweetness of the caramel filling perfectly. It doesn’t weigh down the bite at all.
I like to whip mine until it just holds its shape—we don’t want stiff peaks here; we want spoonable clouds. If you happen to have some cinnamon or a tiny pinch of salt left over from your filling prep, you can whisk that right into the cream before you whip it up. It’s a subtle enhancement, but it really pulls the flavors together.
Something Fun and Fruity
Okay, hear me out on this one. If you’ve had a big, rich savory meal, sometimes you just want something a little brighter to finish things off. That’s when a scoop of bright, tangy sherbet comes in handy. I am obsessed with a scoop of tart raspberry sherbet alongside a slice of this rich tart. The tartness of the raspberry cuts right through the sugar and fat, leaving your palate refreshed.
You can find some fantastic homemade recipes for sherbet, or if you are in a rush, grab a store-bought version. Check out my recipe for quick raspberry sherbet if you want to try making a batch yourself this week! It’s shockingly easy and tastes miles better than anything from the freezer aisle.
A Simple Garnish Touch
Even if you skip the ice cream or the whipped cream, don’t forget the final touch! Before you serve any slice, give the plated dessert a tiny, final drizzle of your reserved salted caramel sauce. You can also lightly sprinkle a few flaky sea salt crystals right over the top—not the coarse sugar, but the good flaky salt. That pop of pure salt right before you take the first bite is what screams “gourmet” and makes this tart truly special!
Frequently Asked Questions About Making a Salted Caramel Apple Tart
I’ve spent so many hours perfecting this recipe, and I know you’re going to have questions as you jump in! Pie and tart crusts can sometimes be tricky, especially when you’re adding a gooey layer like caramel. Don’t stress, I’ve got the answers to the most common things I always get asked about my Salted Caramel Apple Tart.
How thick should the lattice strips be for the dough?
This is one of those little details that really affects the finished look! For a standard 9-inch tart, you want your lattice strips to be between 1/2-inch and 3/4-inch wide. If you cut them too thin—say, 1/4-inch—they tend to shrink a little too much during baking and might look wimpy or dry out before the filling sets. If they are too thick, they won’t weave nicely and might bake unevenly compared to the bottom crust. A pastry wheel definitely makes consistent cutting a breeze!
My filling seems too juicy when I slice the tart. What did I do wrong?
Oh, that happens to the best of us! While I specify a required 3-hour cooling time in the instructions, sometimes that’s just not enough, especially if your kitchen is warm. The number one reason for a juicy filling is slicing the tart before the caramel and the flour have a chance to fully solidify and set up. If you slice it warm, it flows out everywhere like soup! Next time, try tossing your apples with a tiny bit more flour or even a teaspoon of cornstarch mixed in with the regular flour. That extra thickener really helps bind things together, but honestly, just letting it cool completely is the best trick!
Can I use a different pan, like a springform or a quiche dish, instead of a standard pie dish?
You can definitely adapt, but you need to be cautious! This recipe is designed for a traditional 9-inch pie dish that is about 1.5 to 2 inches deep. If you use a shallower quiche dish, you might run out of space for all 10 cups of apples, which is crucial for texture balance! If you use a springform pan, you need to make sure your bottom crust is sturdy and that you line the base well—maybe even using a parchment circle—because the caramel might leak a tiny bit during baking if the seal isn’t perfect. Sticking to the deep dish is easiest for your first try.
Do I have to use salted caramel, or can I use plain caramel?
You absolutely *can* use plain, gorgeous, homemade caramel, but you’ll be missing out on the signature flavor of this dessert! That hint of saltiness is what cuts through the richness of the butter crust and prevents the whole thing from tasting like a one-note sugar bomb. If you don’t have salted caramel sauce, just take your plain caramel and stir in about 1/2 teaspoon of flaky sea salt per cup of sauce. Taste as you go, though! The salt is non-negotiable here to balance the apples.
If you’ve got this tart mastered, you might want something savory next time. Have you seen my recipe for lasagna soup? It’s so cozy!
What to Bake Next After Your Salted Caramel Apple Tart
Wow, you did it! You made a show-stopping, perfectly latticed, caramel-drizzled masterpiece. Take a moment to be proud of yourself; mastering a layered tart like this is a huge accomplishment! I really hope your family loves diving into those warm, spiced apples and salty caramel.
Now that you’ve conquered the double crust, I’d love to know how yours turned out! If you made any fun twists or ran into a question I didn’t cover here, feel free to leave a comment on the recipe—I read every single one!
When you’re ready for your next baking adventure, maybe try something completely different to cleanse the palate! If you want another impressive dessert that’s a little less structural and a little more boozy, check out my Cranberry Orange Prosecco Punch recipe. It’s fantastic for parties and needs zero oven time!

Salted Caramel Apple Tart
Ingredients
Equipment
Method
- Prepare your chosen pie crust recipe through step 5. Chill the pie dough in the refrigerator for a minimum of 2 hours before use.
- If you are not using store-bought salted caramel sauce, prepare the homemade version now so it has time to cool.
- Make the filling: In a large bowl, combine the apple slices, sugar, lemon juice, flour, cinnamon, allspice/cloves, and nutmeg. Stir until everything is mixed well. Set the bowl aside.
- Roll out one disc of the chilled pie dough on a floured surface. Turn the dough every few rolls until you have a 12-inch diameter circle. Carefully place the dough into a 9-inch pie dish that is 1.5 to 2 inches deep. Press the dough into the dish smoothly.
- Spoon the apple filling into the crust. Pile the apples high and tightly together. Drizzle 1/2 cup of the caramel sauce evenly over the apples.
- Remove the second disc of chilled dough. Roll it into a circle between 12 and 14 inches in diameter. Cut strips of dough that are 1/2-inch to 3/4-inch wide using a pastry wheel or sharp knife. Weave the strips over and under each other to create a lattice top. Trim excess dough. Fold the overhang towards the center and pinch the edges to seal the top and bottom crusts. Crimp or flute the edges.
- Brush the top and edges of the pie crust lightly with the egg wash. Sprinkle with coarse sugar, if you are using it.
- Place the pie in the refrigerator for 20 to 30 minutes while you preheat the oven to 400°F (204°C).
- Place the pie onto a large baking sheet. Bake for 25 minutes. Then, reduce the oven temperature to 375°F (190°C) without removing the pie. Place a pie crust shield on the edges. Continue baking for 35 to 40 more minutes, or until the filling bubbles around the edges and reaches an internal temperature of about 200°F (93°C).
- If the top browns too much near the end of the bake time, remove the shield and tent the entire pie with foil.
- Remove the pie from the oven and place it on a cooling rack. Cool the pie for at least 3 hours before slicing. Drizzle the remaining salted caramel over the entire pie or onto individual slices.
- Store leftover pie covered at room temperature for up to 1 day or refrigerated for up to 5 days.