

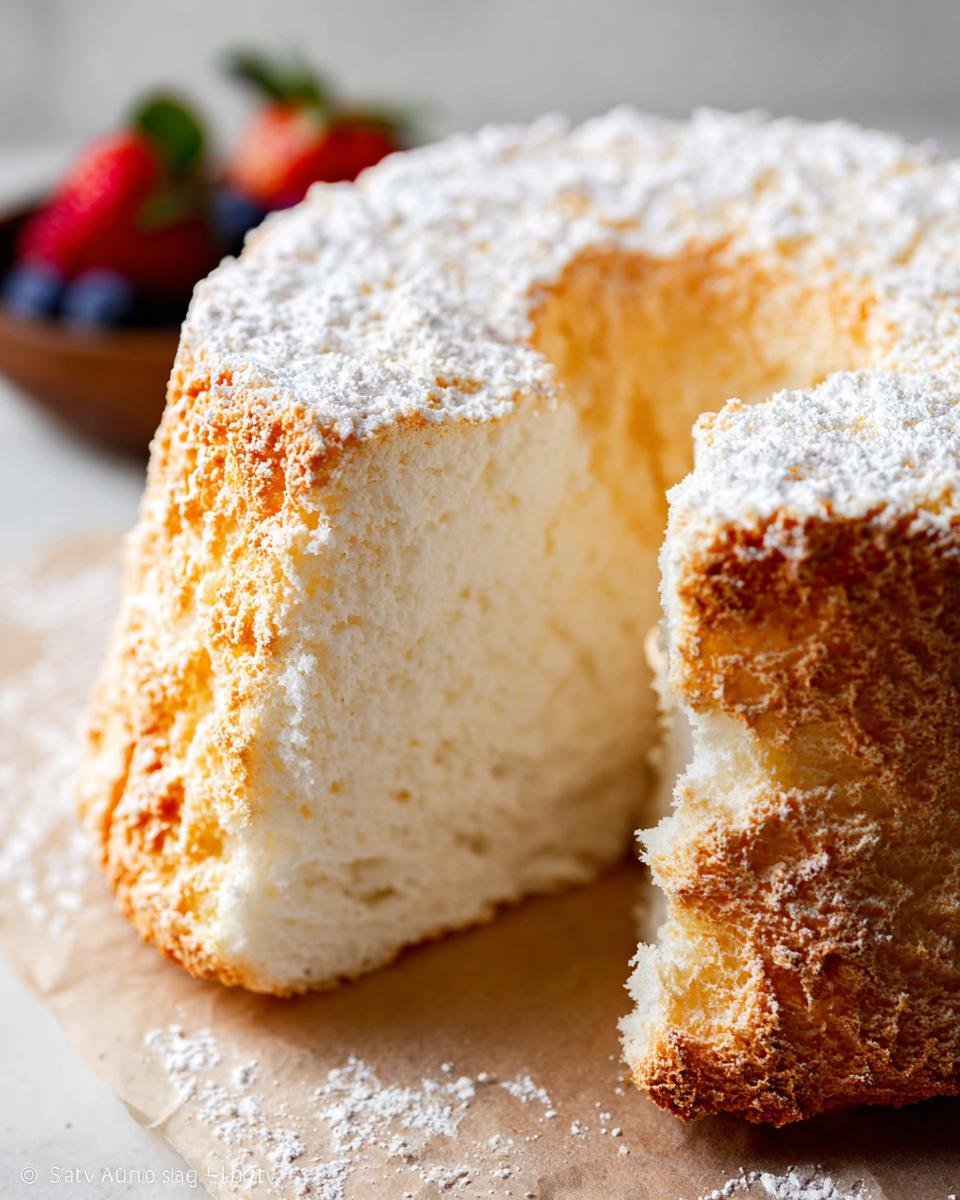
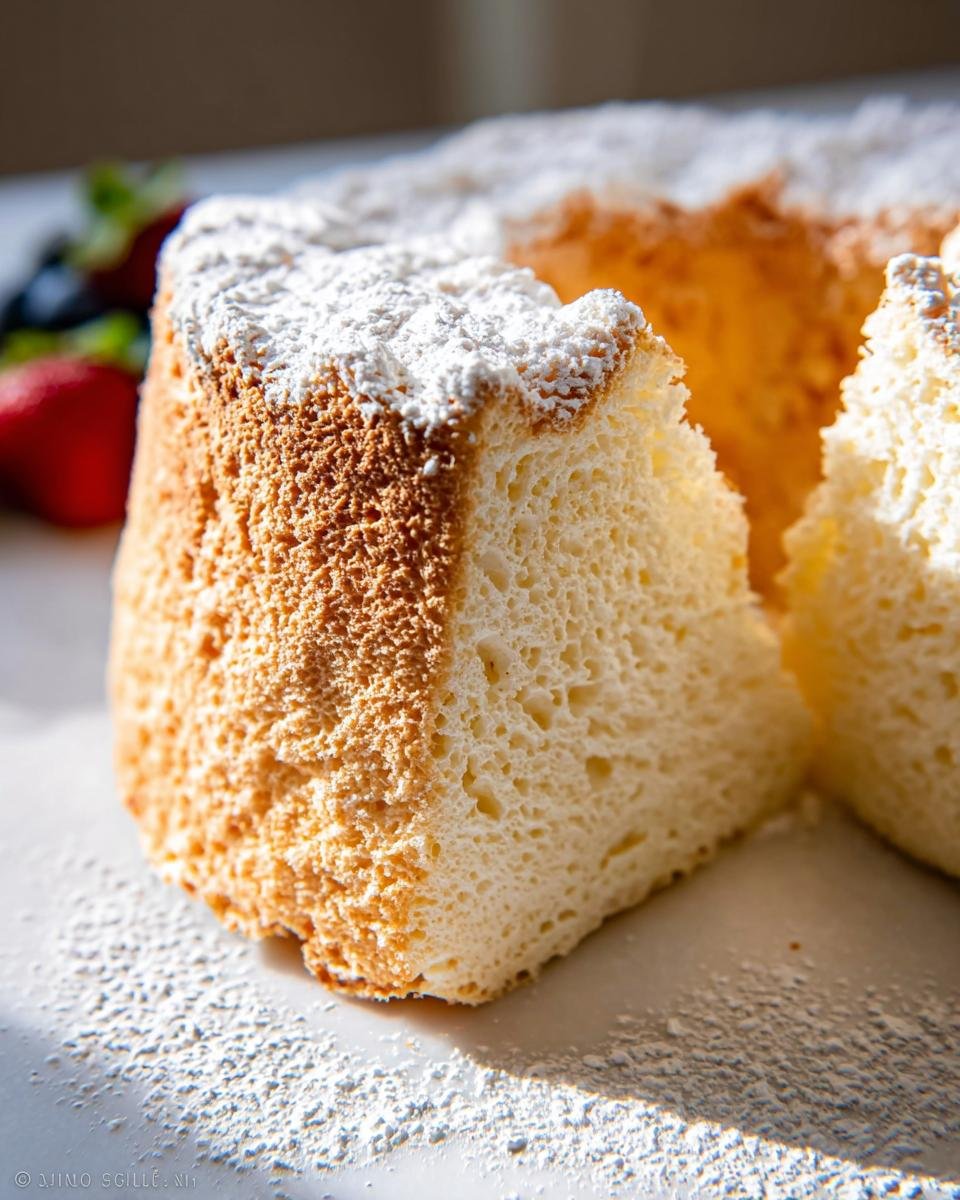
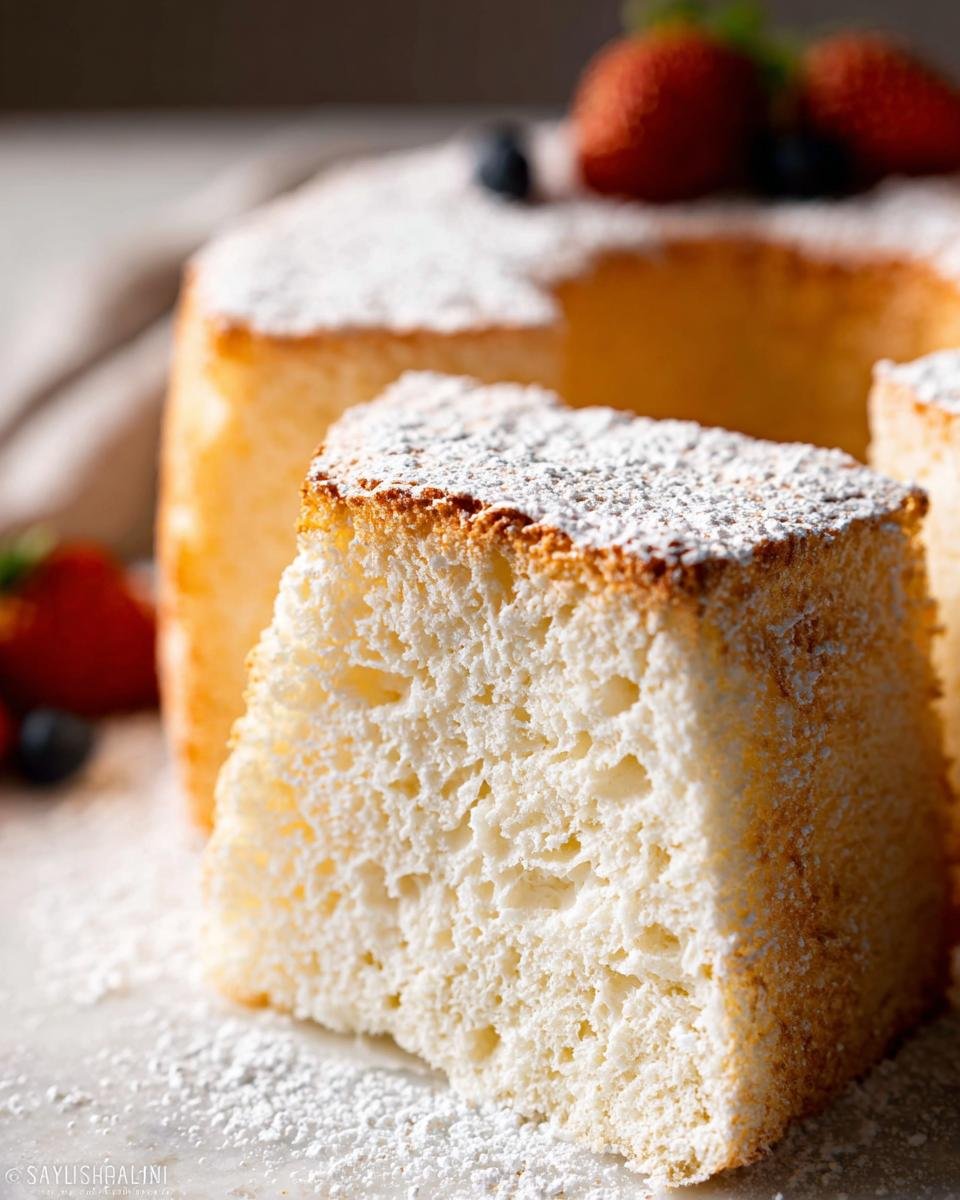
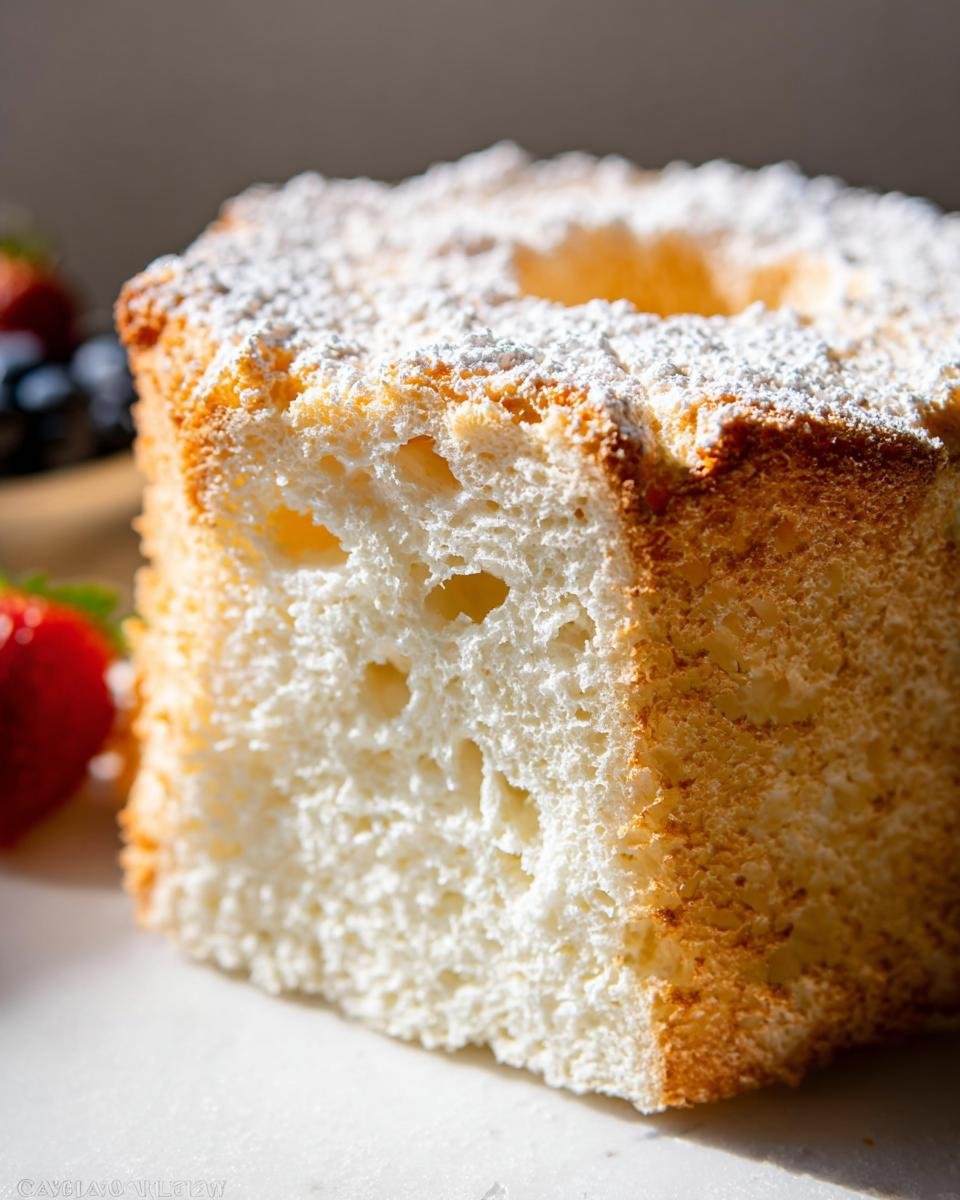
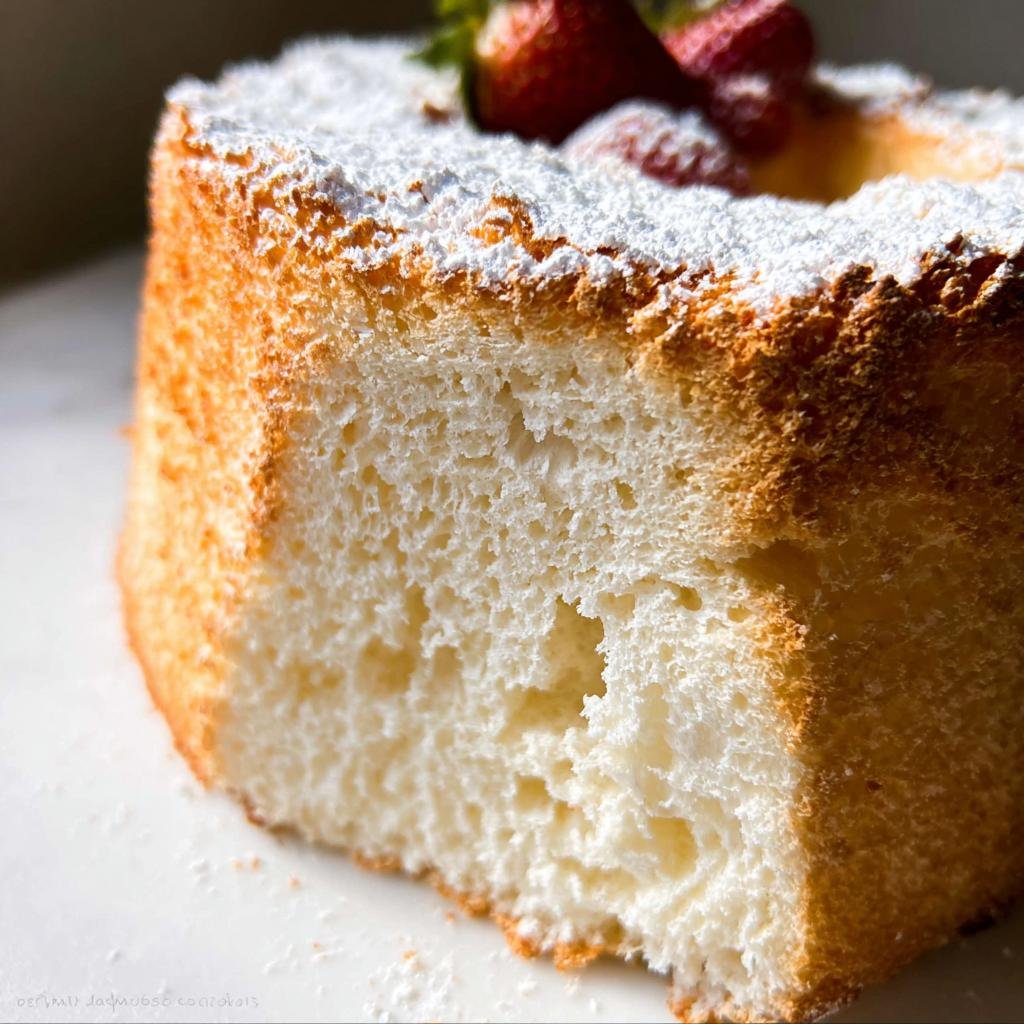
If you’ve ever been hesitant about making angel food cake because you think it’s going to deflate the second it leaves the oven, I get it! Seriously, I remember hovering by mine, totally convinced that wobbly tower of meringue was going to crater. But let me tell you, achieving that truly ethereal, cloud-like structure for an Angel Food Cake Light and Airy isn’t magic—it’s just knowing a few tiny secrets, mainly making sure we turn our granulated sugar into superfine sugar first. My grandmother used to tell me that baking an angel food cake was like “whipping clouds into dessert,” and honestly, once you get the texture right, that’s exactly what it feels like.
This recipe is the one that finally made me feel like I understood what she meant. It’s simple, it’s classic, and when you pull it out, you’ll have that perfect, towering cake you always dreamed of. Trust me, you’re ready for this!
Why This Angel Food Cake Light and Airy Recipe Works
I know some cake recipes feel fussy, but this one is designed to succeed, even if you’re new to making this classic. Getting that incredible texture for an Angel Food Cake Light and Airy really comes down to a few foundational steps that we nail right away. It’s about trusting the process, not fighting it!
- It delivers that signature, fluffy texture that makes angel food cake so beloved—it’s almost weightless!
- We use a trick called processing the sugar, which guarantees you beat those egg whites perfectly every time.
- It’s an honestly impressive dessert for any gathering, and the from scratch flavor is worlds better than anything you buy in a box. This lets you totally rock that homemade goodness vibe.
Essential Equipment for Your Angel Food Cake Light and Airy
You know how some cakes are forgiving if you swap a whisk for a wooden spoon? Well, angel food cake is not one of them, bless its delicate little heart! Because we are whipping air into egg whites to get that amazing height, we really need the right tools. Don’t worry, though; most of these are things you probably already have lying around. The key is using them correctly, especially when making an Angel Food Cake Light and Airy.
The absolute must-have item—and please listen to me on this—is the proper pan. You cannot substitute this for a standard Bundt or even a springform pan. It needs to be a tube pan, specifically one that doesn’t have those sticky non-stick coatings!
Here’s the list of what you’ll need to gather before you whisk anything:
- A food processor or a solid blender. This is crucial for transforming your granulated sugar into that magical superfine texture we need for the meringue base.
- Your hand mixer or, if you’re lucky, that trusty stand mixer. You absolutely need the whisk attachment for this job.
- A fine mesh strainer. We’ll use this later to gently introduce the flour mixture without collapsing all that glorious air.
- A large bowl. Make sure it’s big enough to whip 12 egg whites without making a huge mess!
- A rubber spatula. This is for folding—and trust me, gentle folding is an art form in this recipe.
- Your 9 or 10 inch tube pan. This pan has those little feet so you can flip it upside down to cool. Seriously, if you don’t have one, stop right now and order one. It’s non-negotiable because it allows the cake to cool suspended, which is what keeps it from shrinking onto itself!
- Finally, grab a wire rack. That’s where the magic cooling happens.
Get your gear ready, make sure that tube pan is completely clean (no grease allowed!), and then we can move on to the ingredients!
Ingredients for the Perfect Angel Food Cake Light and Airy
Okay, this is where things get precise, but don’t let that scare you! Angel food cake is one of those recipes where the ingredient quality and preparation really shine through. Since we’re aiming for that gorgeous, Angel Food Cake Light and Airy texture, having everything measured correctly is going to be your best friend. Remember, we’re working with basic elements, so treating them right makes all the difference.
I’ve separated the list into the exact groups we use when actually baking, so you can prep everything in order. We’ve got the prep for the sugar, the dry stuff, the important aeration base (the meringue!), and then just some fun extras for serving later.
For Sugar Preparation
This step is non-negotiable for getting that cloud-like lift! We need our sugar super fine right before we add it to the egg whites.
- 1 and 3/4 cups of granulated sugar (that’s about 350g, if you’re weighing). This is the pile we’ll process down until it’s powdery.
For Dry Ingredients
Don’t just scoop your flour! For this cake, your flour needs to be measured gently or you’ll end up with a dense cake, and we definitely don’t want that. We need air!
- 1 cup of cake flour (around 133g). Please remember to spoon this gently into your measuring cup and level it off—don’t pack it in!
- 1/4 teaspoon of salt. Just a little bit to balance out all that sweetness.
For the Meringue Base
This is the heart and soul of the cake! The egg whites need to be at the perfect temperature to whip up into stiff, reliable peaks that can hold everything up high. If your whites are too cold, they won’t volume up properly.
- 12 large egg whites—and make absolutely sure they are at room temperature! This helps them reach maximum volume.
- 1 and 1/2 teaspoons of cream of tartar. This is the stabilizer! It helps keep our whipped whites firm, especially crucial for an Angel Food Cake Light and Airy.
- 1 and 1/2 teaspoons of pure vanilla extract. Real vanilla really makes the flavor pop.
Optional Serving Components
Once the cake is cooled and standing tall, you can decide how fancy you want to get! Sometimes this cake is so beautiful with just a light dusting.
- Confectioners’ sugar, as needed, for dusting.
- Whipped cream, as needed.
- Fresh berries, as needed.
Step-by-Step Instructions to Make Angel Food Cake Light and Airy
This is the moment of truth! When you follow these steps carefully, you’ll see why this recipe creates such an Angel Food Cake Light and Airy structure. We are basically building a sponge out of nothing but egg whites and sugar, so we have to be systematic. Take your time here, especially when folding; rushing ruins the air we worked so hard to incorporate!
Preparation and Dry Ingredient Aeration
First things first, let’s get the environment ready for baking success. You need to adjust your oven rack to the lower middle spot—this helps the massive cake cook evenly from the bottom up. Then, crank the heat up to 325°F (163°C). Preheating now means everything else will be ready when the oven is.
Next, grab your food processor or blender. This is where we refine the texture! Take all that granulated sugar and pulse it until it looks incredibly fine and powdery, almost like confectioners’ sugar but not quite. Now, this is important: measure out exactly 1 cup of that lovely new superfine sugar and set it aside for step two. Don’t mix it in yet!
Take the rest of the newly powdered sugar and put it back in the processor with your cake flour and salt. Pulse this dry trio about 5 to 10 times. Why do we do this? We are aerating the flour, making it lighter, so it doesn’t weigh down our egg whites later. It becomes a light, dusty blend that just begs to be folded in gently. You just introduced air at every stage already!
Whipping the Meringue for Angel Food Cake Light and Airy
Now for the whites! Pour your room temperature egg whites and the cream of tartar into that big, clean mixing bowl. (Remember, the bowl and whisk must be sparkling clean—any trace of grease will stop those whites from whipping up!). Start whipping them on medium-low speed for about a minute until they look foamy and slightly bubbly.
It’s time to add the 1 cup of reserved sugar we set aside earlier. Start adding it very slowly, spoonful by spoonful, while the mixer is still at medium-high speed. If you dump it all in once, the sugar crystals will deflate the air we’ve built up. Keep whipping, and watch the texture change! You’re looking for the moment the meringue holds shape when you lift the whisk, forming soft peaks. This usually takes around 5 or 6 minutes total whipping time. Once you hit that soft peak stage, drop in your vanilla extract and beat just long enough to mix it in. Don’t overbeat, or you’ll start breaking down the structure!
Folding in Dry Ingredients Gently
This is where precision matters most. We have a beautiful, airy meringue, and we absolutely cannot lose that volume when adding the flour mixture. Get your fine mesh strainer ready. You will sift the flour mixture over the meringue in three separate additions. That means you sift once, gently fold it in, then sift the next third, fold, and repeat until the flour is just combined.
Use your rubber spatula for this. You don’t stir; you fold! Cut down the center of the batter to the bottom of the bowl, sweep the spatula toward you along the side, and gently lift the heavier batter up and over the lighter dry ingredients. Turn the bowl slightly after each fold. You should only fold until you can no longer see streaks of white flour. Honestly, it takes patience. If you see a few dry spots, that’s better than aggressively mixing and making your cake dense.
Once it’s just combined, pour that light batter right into your ungreased tube pan. Give the pan a gentle shimmy on the counter a couple of times to help smooth out the top surface and release any tiny surface air pockets. Don’t bang it, just shimmy!
Baking and Essential Cooling for Height
Carefully place the pan into your preheated 325°F oven. Plan on baking for about 40 to 45 minutes. About halfway through, quickly rotate the pan so the side facing the door gets an even bake, then close it up quickly. The cake is done when a wooden toothpick inserted deep into the center comes out clean, which means it’s cooked through.
But here is the most critical secret to achieving that sky-high, Angel Food Cake Light and Airy result: cooling! As soon as you take it out of the oven, you must immediately invert the pan—flip it upside down! Many tube pans have little feet built into the rim just for this purpose, or you can set the center tube over a bottle neck. It must cool completely upside-down on a wire rack. This cooling process takes a solid 3 hours, minimum. If you try to cool it right-side up or too fast, gravity will win, and your beautiful cake will collapse into a sad, short pancake. After those three hours, run a thin knife around the sides and the center tube. Give the pan a firm tap on the counter, and the cake should slide right out!
If you’re looking for some quick inspiration on easy baking projects while this cools, check out some of my quick recipes!
Tips for Success When Making Angel Food Cake Light and Airy
Look, I know I laid out a lot of steps, but honestly, making an Angel Food Cake Light and Airy really boils down to avoiding a few common pitfalls. When you pay attention to these details, you’re going to get that perfect, tall cake every single time, which is the dream for your next healthy treats baking session!
My grandma always said, “You can’t fool the air, Sara. It knows if you’re cheating,” and she was right! Here are the non-negotiable things to remember to ensure success:
- Egg White Temperature is Everything: Please, please, please take your 12 egg whites out ahead of time! Room temperature whites whip up faster and achieve way more volume than cold ones. If you forget, you can gently place the whole, separated whites bowl into a larger bowl of warm (not hot!) water for about 10 minutes while you gather everything else.
- Tube Pan Purity: I cannot stress this enough: Do NOT grease your tube pan! Angel food cake needs to cling to the sides of that pan to climb as it bakes, and then those little feet need a surface to cling to while cooling upside down. If you grease it, the structure fails. No substitutes here—this isn’t the time for a Bundt pan, just stick to the tube pan.
- Sugar Substitution Shortcut: If you happen to have superfine sugar (also called caster sugar) ready to go, you are ahead of the game! Skip the food processor step for the sugar itself. Just use 3/4 cup of your superfine sugar in the dry mixture, and use the remaining 1 cup of superfine sugar when whipping the whites. It saves time and gives you that perfect fine crystal structure needed for the best volume.
- The Gentle Fold: When you introduce the flour mixture, stop thinking about mixing and start thinking about *incorporating*. Use your spatula to delicately turn the batter over on itself. Resist the urge to stir quickly; that’s how you knock the air out. Folding gently ensures you keep that signature Angel Food Cake Light and Airy texture from the first whisk to the last fold.
Stick to these few rules, and your cake will soar!
Variations for Your Angel Food Cake Light and Airy
While the pure, classic taste of an Angel Food Cake Light and Airy is heavenly all on its own, I love finding ways to dress it up, especially when I’m taking it to a party or looking for something fun for the kids. Because the cake itself is so structurally sound once cooled upside down, it’s really a fantastic base for easy customization. We aren’t messing with the main meringue structure, but we can definitely play with flavor infusions and toppers!
If you’re gathering ingredients for a special event or making this around the holidays—check out my thoughts on holiday recipe planning, it might inspire you!
Adding a Fun Pop of Color Inside
For those times when you want the cake to look just as fun as it tastes, adding sprinkles directly into the batter is a total showstopper. I only suggest this if you are making the cake for a festive occasion, like a birthday or summer gathering, because we have to be delicate!
- The trick here is grabbing about 1/2 cup of rainbow sprinkles, or whatever color fits your theme.
- Gently fold them in right at the very end, only after the flour mixture is completely incorporated but before you pour the batter into the tube pan.
- You have to be super gentle because heavy sprinkles can weigh down the air bubbles, but just moving them through the batter lightly usually works out great for a fun surprise when slicing!
Switching Up the Toppings for a New Flavor Profile
If you’ve ever had this cake just dusted with powdered sugar, you know that’s enough, but sometimes you want something richer. Since angel food cake is so light, it actually pairs beautifully with richer toppings like chocolate ganache, which you wouldn’t dare put on a heavy pound cake.
You can certainly stick to the lighter options like fresh whipped cream and berries—that’s my go-to when I want the cake flavor to really shine through.
- The Decadent Choice: Instead of confectioners’ sugar, try drizzling a thin stream of slightly cooled chocolate ganache over the entire cooled cake. The richness of the chocolate contrasts so nicely with the light, airy crumb.
- The Zesty Addition: If you’re making a simple vanilla glaze but want to amp up the brightness, mix in the zest of one fresh lemon or orange into the glaze before pouring. It wakes up the flavor without making the cake heavy.
These simple tweaks let you keep the integrity of the Angel Food Cake Light and Airy while changing up the overall presentation for whatever event you’re serving it at!
Storing and Reheating Your Angel Food Cake
So you made the most perfect, tall, and cloud-like Angel Food Cake Light and Airy—congratulations! Now the hard part: making it last. Because this cake is so light and contains no fat, it actually keeps really well, but you do need to treat it right so it doesn’t dry out or start smelling like the fridge.
I always recommend eating it the day you make it, obviously, because that fresh texture is unbeatable. But if you need to keep it around for a party the next day or want to bake ahead, don’t worry; we have instructions for that. You don’t really “reheat” angel food cake, since heating something so delicate can ruin the texture, but we can definitely store it effectively.
Refrigeration Rules for Leftovers
If you have leftovers that you plan to eat in the next few days, the refrigerator is your best bet—but you have to protect it from drying out. The downside is that cold temperatures can slightly stiffen the texture, making it a little less dreamy than room temperature, but it’s still miles better than a collapsed cake!
Here’s how I manage leftovers:
- Once the cake is completely cool (and you’ve taken it out of the tube pan!), slice what you plan to eat over the next day or two.
- Cover the remaining cake tightly with plastic wrap. Some people even like to place the wrapped slices into an airtight container for an extra buffer against fridge air.
- The recipe notes say it keeps well for up to 5 days in the refrigerator, but I aim for 3 days maximum to keep that softness!
If you are serving cold slices, let them sit out on the counter for about 30 minutes before serving. That little bit of time warms them just enough to bring back a bit of tenderness.
Freezing for Future Angel Food Cake Light and Airy Moments
This is my favorite trick for making an Angel Food Cake Light and Airy when I know I won’t eat it all right away. Angel food cake freezes surprisingly well, which is wonderful for stress-free party planning! You can prep this cake days or even weeks ahead of time.
For freezing, make sure the cake is completely cooled before you wrap it up. If you try to freeze a warm cake, you’ll get ice crystals, and that’s just not good for the delicate structure.
My process is super simple:
- Wrap the whole, unsliced cake tightly in a layer of plastic wrap. Seriously, wrap it like a mummy to keep all the air out.
- Then, wrap it again in a layer of aluminum foil or put the whole thing into a large zip-top freezer bag.
- It should last beautifully for up to 3 months in the deep freeze.
Thawing to Perfection
When you finally decide it’s time to enjoy your frozen angel food cake—maybe you need a light dessert after a big dinner—don’t rush the thawing process! Thawing in the refrigerator overnight is the only way to go. It allows the cake to slowly return to room temperature without moisture condensing too rapidly on the surface.
Once it’s thawed overnight, just unwrap it and let it sit on the counter for another hour before slicing. That way, it’s perfectly soft, wonderfully light, and ready for whipped cream!
Serving Suggestions for Classic Layer Cake Party Treats
Even though this Angel Food Cake Light and Airy is tall, delicate, and absolutely stunning just on its own, it truly shines when you dress it up for a party! We aren’t talking about heavy frosting or complicated construction here; we are leaning into that airy simplicity that makes it such a wonderful centerpiece for any celebration. If you are planning a big gathering, this cake is actually much easier to manage than a traditional butter-based layer cake because it requires zero fuss mixing heavy fillings.
It’s the perfect kind of dessert to bring to a potluck or serve after a nice meal when you want something satisfying but won’t leave people feeling overly heavy. Seriously, this is the definition of a classic layer cake party treat that feels both nostalgic and fresh at the same time.
The Classic Berry and Cream Pairing
If you take this cake out of the pan, dust it lightly with confectioners’ sugar, and serve it straight up, it’s a winner. But if you want to elevate it just a tiny bit without losing that light texture, you can’t beat berries and cream. It’s the traditional way for a reason!
The best way to serve it is to slice the cake first, then plate each slice individually. Don’t try to pour whipped cream over the whole thing while it’s intact, or you might deflate those lovely edges.
- Whip heavy cream until soft, not stiff, peaks form. You want it slightly looser so it drapes beautifully over the crumb.
- Toss fresh strawberries, raspberries, or blueberries with just a tiny sprinkle of sugar about 15 minutes before serving. This draws out their juices, creating a little syrup!
- Spoon a dollop of whipped cream onto the plate, set the cake slice on top, and artfully arrange the macerated berries around the base. Beautiful!</li
Using Angel Food Cake as a Dessert Base
My favorite way to use this recipe for a bigger event is treating the slices almost like a sponge base for something even more complex. Because it’s low-fat and structurally reliable, it soaks up gorgeous juices beautifully without getting soggy too fast.
Think of each slice as the bottom layer of a mini-parfait. This works especially well if you’re serving it for a casual summer dinner idea when people want something light after rich main courses.
Here are two fast ideas that keep the plating simple but the flavor impressive:
- Fruity Parfait Style: Layer cubes of the angel food cake in a clear glass with alternating layers of lemon curd (shop-bought is totally fine here!) and a layer of those macerated berries we talked about. Top with a tiny swirl of whipped cream.
- Chocolate Dipped Edges: If you didn’t go the ganache route earlier, you can take the fully cooled slices and dip just the top edge into melted dark chocolate. Lay them on parchment paper until the chocolate sets. This offers a nice little *snap* that plays so nicely against the airy cake without overwhelming it.
No matter how you slice it, this cake makes every serving feel special. It’s hearty enough for a classic layer cake party spread but light enough that everyone will ask you for the recipe!
Frequently Asked Questions About Angel Food Cake
It’s only natural to have a few questions when tackling a recipe that feels this delicate! Making an Angel Food Cake Light and Airy is all about technique, and sometimes you just need assurance that what you’re doing is right. I’ve gathered up the questions I get asked the most. Think of this as our little troubleshooting session before you even start whipping!
Can I use pre-separated egg whites from a carton?
Oh, I wish the answer was a solid yes, but for this recipe, I really don’t recommend it. You need 12 large egg whites, and those cartons often use whites that have been pasteurized, which means they’ve been heated slightly. That heating process changes the protein structure, and it makes it much, much harder to whip them up into the voluminous, strong meringue needed for a truly Angel Food Cake Light and Airy result.
If you are in a real pinch, you can try, but know that you might not get the same height, and you’ll definitely need to whip them for longer. Always try to use fresh, room temperature whites if you can!
Why absolutely must the tube pan be ungreased?
This is probably the most important “why” question for angel food cake! When we whip those egg whites, we create billions of tiny air bubbles. Those bubbles need something to hold onto as the cake bakes and rises in the oven. The walls of the ungreased aluminum tube pan provide that necessary friction.
If you grease that pan—even a little bit—the batter slips down the sides instead of climbing up. The result is a cake that might rise in the center but will buckle and deflate around the edges, possibly turning into a sad, short layer cake instead of the tall, Angel Food Cake Light and Airy dessert we are aiming for. Also, remember that the little feet on the pan are there to hold the cake upside down when cooling to prevent gravity from squishing those delicate air cells!
What’s the real difference between cake flour and all-purpose flour here?
This is a fantastic question, and it’s key for achieving that light texture, especially if you plan to serve this at a big easy healthy recipe party! Cake flour has a much lower protein content than all-purpose flour—usually around 7-9% versus the 10-12% in AP flour.
When we mix flour with liquid in baking, the protein forms gluten. We want very little gluten development in an angel food cake because we want it to dissolve softly when you eat it, not offer resistance. AP flour develops more gluten, leading to a chewier, tougher cake. Cake flour keeps that crumb incredibly tender and delicate, which is exactly what defines a perfect Angel Food Cake Light and Airy.
How do I know if I have whipped the meringue too little or too much?
You want to aim for stiff, glossy peaks, but you want to stop just before they look dry or clumpy. If you under-whip (soft peaks), the flour mixture will weigh the meringue down, and you’ll get a short cake. If you over-whip, the meringue looks dry, separated, or curdled when you lift the whisk. If it’s dry, it means you’ve beaten out too much air, and those peaks will break when you fold in the flour.
The perfect visual cue is when you lift the whisk, the peak stands straight up but the very tip gently curls over—that’s stiff peak territory. If the peek curls over dramatically, you’re probably over-beaten. Remember, that cream of tartar is helping you maintain your structure!
If you’re finding this guide really helpful, please consider leaving a rating below!
Estimated Nutritional Data for This Cake Recipe
I feel like I need to start this section with a big disclaimer here: I am a baker, not a nutritionist, so please take these numbers with a grain of salt—and maybe a grain of that superfine sugar we just made! Since this Angel Food Cake Light and Airy is naturally very low in fat because there’s no butter or oil in the main recipe, the calories come mostly from the sugar and the high protein content of all those lovely egg whites.
This breakdown is based on dividing the entire recipe by 12 servings, which is what most people get from a standard tube pan. If you cut yours into smaller slices for a big diet nutrition focused dessert spread, the macros will change!
When you’re planning out your dessert table, keep these estimates in mind for one slice of the unadorned cake:
- Calories: Approximately 140 – 160 calories
- Total Fat: Less than 0.5 grams (Seriously, it’s practically fat-free!)
- Cholesterol: About 0 mg (Since we only use the whites, the cholesterol is negligible, which is great for a classic dessert!)
- Sodium: Around 60 mg (This comes mainly from the added salt)
- Total Carbohydrates: Roughly 30 – 35 grams (This is mostly the sugar content)
- Dietary Fiber: Less than 1 gram
- Protein: About 4 grams (That’s a lot of protein for a cake!)
See? It’s ridiculously light! That’s the beauty of using the meringue structure instead of relying on heavy fats. If you decide to add whipped cream and berries, factor in an extra 40 to 60 calories per serving, but that’s usually worth it for serving up such an impressive Angel Food Cake Light and Airy!
Share Your Light and Airy Angel Food Cake Creations
Wow, if you made it this far, that means you just pulled a spectacular Angel Food Cake Light and Airy out of the oven—or you’re about to! I am so incredibly proud of you for tackling this classic dessert. Honestly, seeing those tall, beautifully baked cakes makes my day every time I hear from a reader.
This recipe has been in my family because it delivers time and time again, but I always want to hear how it turns out for you in your kitchen. Did those egg whites finally whip up exactly right? Did you manage to fold the flour without knocking out too much air? I want to know all the details!
Leaving a Rating and Comment
If this recipe totally delivered that light and fluffy texture you were looking for, please, please take a moment to leave a star rating right here on the page. Those ratings really help other home bakers feel confident enough to try making their own Angel Food Cake Light and Airy. A good rating tells me that my grandmother’s wisdom—and our little sugar-processing trick—still holds up!
When you leave a comment, tell me how you served it! Did you go classic with just confectioners’ sugar, or did you go all out with chocolate ganache? I’m always looking for new serving ideas for my next next baking adventure.
Sharing Your Masterpiece Photo
If you snapped a gorgeous picture of your towering angel food cake, I would absolutely love to see it in action! Seriously, nothing beats seeing how high these cakes climb, especially when they’ve cooled upside down perfectly. You can tag me on social media or use the built-in photo feature below if you have one.
Sharing photos helps everyone see just how achievable a truly Angel Food Cake Light and Airy can be, even when you’re just starting out. Remember, every successful bake, no matter how simple it looks, is a huge win in the kitchen.
Happy baking, and I can’t wait to read all about your success!
Light and Airy Angel Food Cake
Ingredients
Equipment
Method
- Adjust the oven rack to the lower middle position and preheat oven to 325°F (163°C).
- In a food processor or blender, pulse the sugar until fine and powdery. Remove 1 cup and set aside to use in step 3; keep the rest inside the food processor. Add the cake flour and salt to the food processor. Pulse 5 to 10 times until the sugar/flour/salt mixture is aerated and light.
- In a large bowl using a hand mixer or a stand mixer fitted with a whisk attachment, whip egg whites and cream of tartar together on medium-low until foamy, about 1 minute. Switch to medium-high and slowly add the 1 cup of sugar you set aside. Whip until soft peaks form, about 5 to 6 minutes. Add the vanilla extract, then beat just until incorporated.
- In 3 additions, slowly sift the flour mixture into the egg white mixture using a fine mesh strainer, gently folding with a rubber spatula after each addition. Do not add the flour mixture all at once. Sift and very slowly fold in several additions. Pour and spread batter into an ungreased 9 or 10 inch tube pan. Shimmy the pan on the counter to smooth down the surface.
- Bake the cake until a toothpick inserted comes out clean, about 40 to 45 minutes. Rotate the pan halfway through baking. Remove from the oven, then cool the cake completely upside-down set on a wire rack, about 3 hours. Once cooled, run a thin knife around the edges and gently tap the pan on the counter until the cake releases.
- If desired, dust with confectioners’ sugar. Slice the cake with a sharp serrated knife. Serve with whipped cream and fresh berries. Store leftovers in the refrigerator for up to 5 days.