
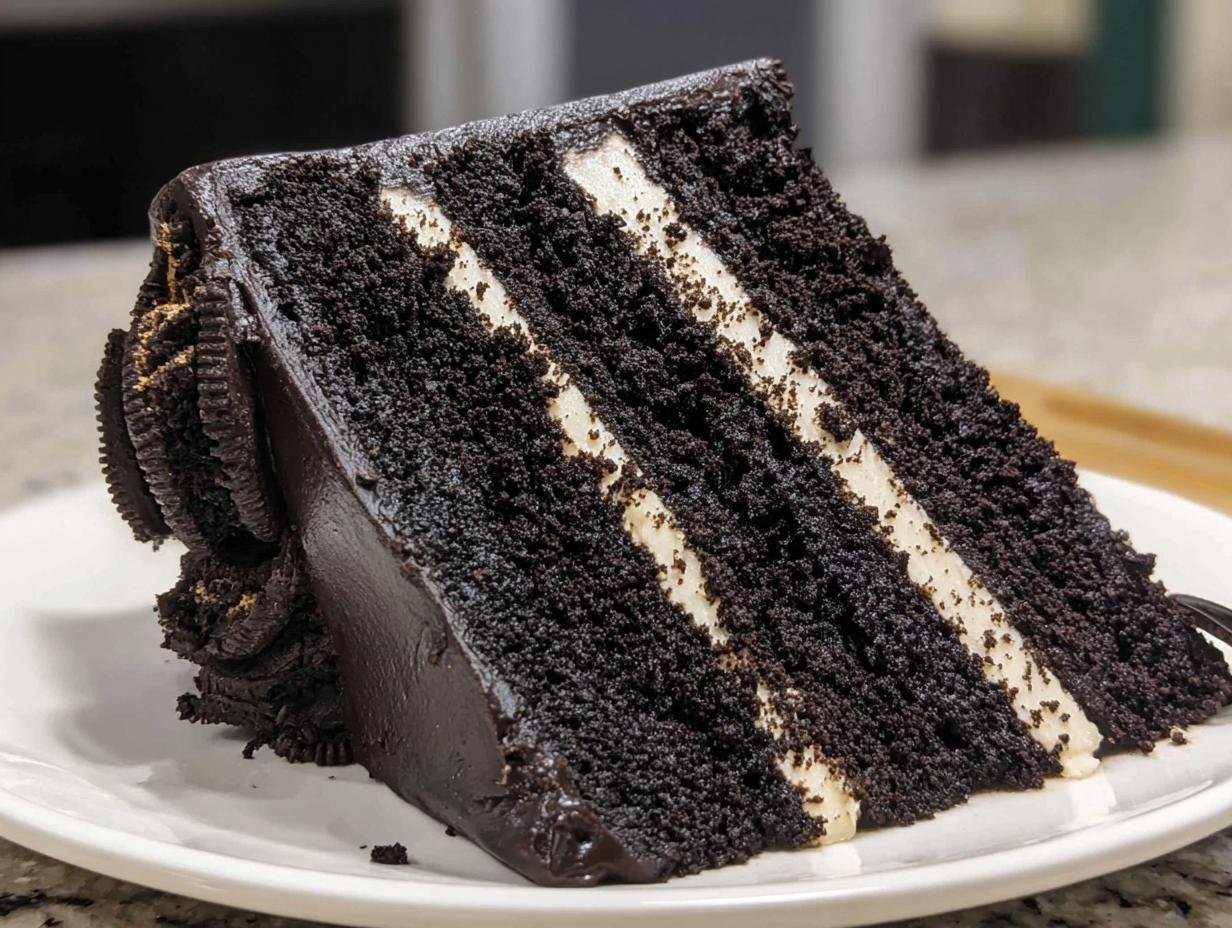
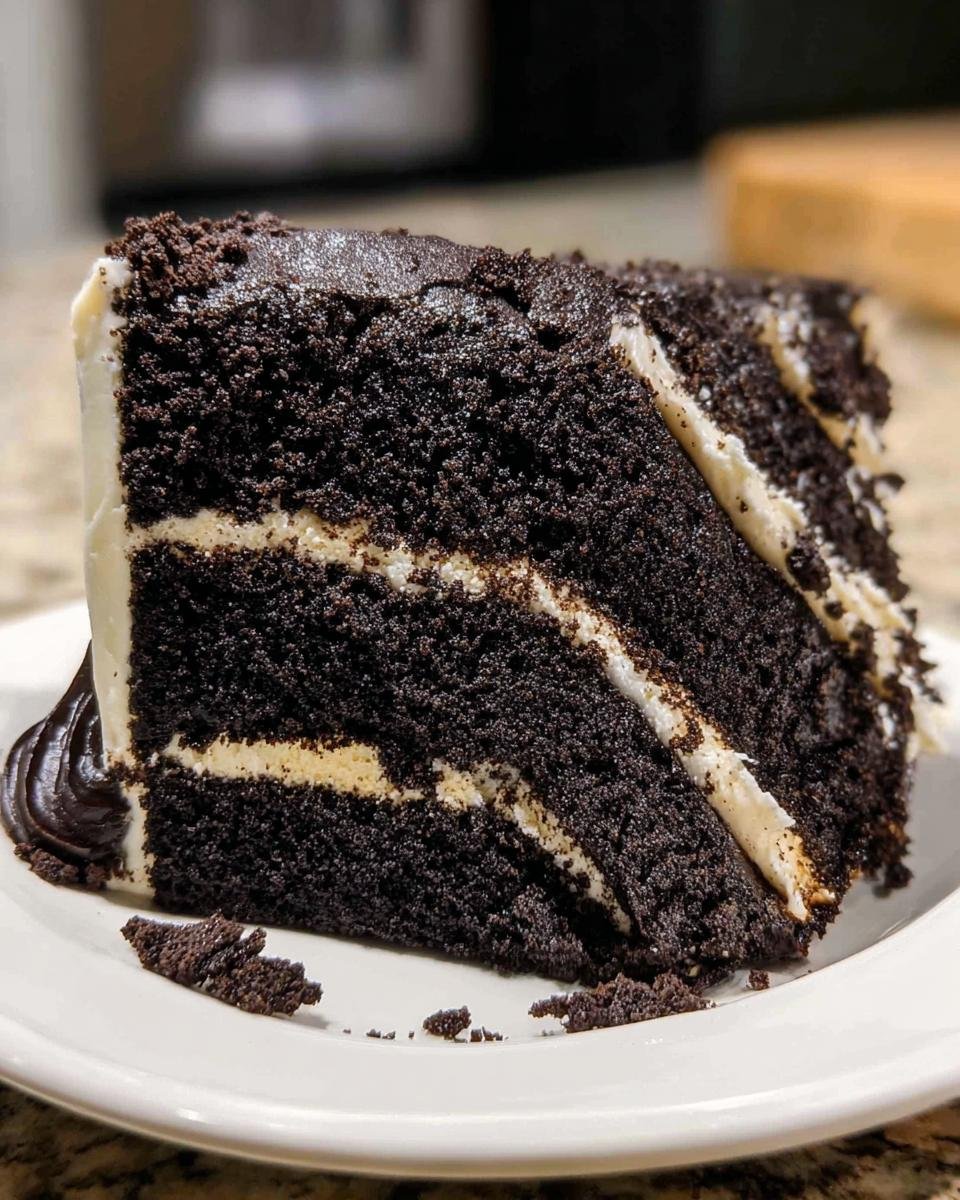
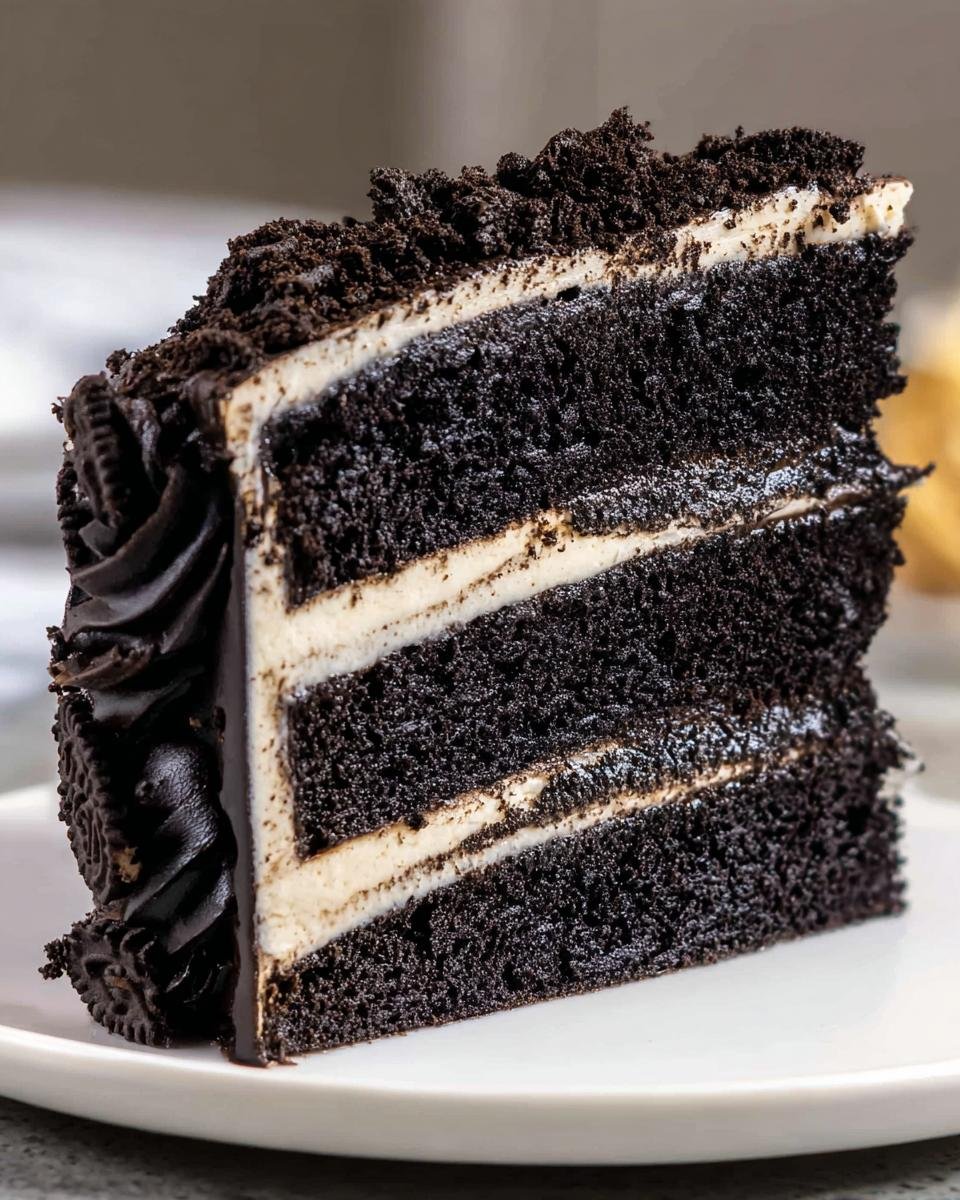
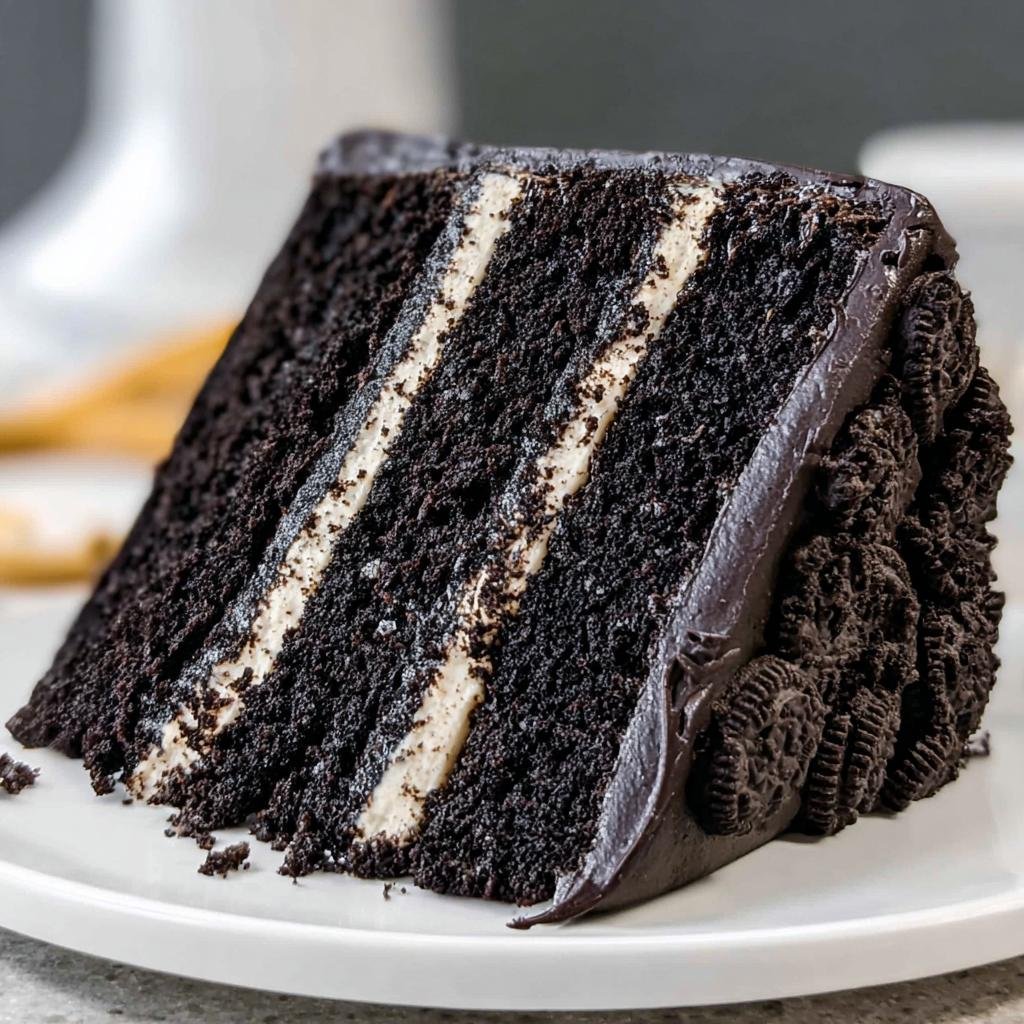
Okay, so you know how some desserts just *look* impressive but are a total nightmare to actually make? Well, forget that! My Black Velvet Oreo Cake is here to prove that you can absolutely have a showstopper that’s surprisingly doable, even for a weeknight treat. Imagine this: layers of the deepest, darkest chocolate cake, so rich it practically melts – that’s the velvet part! Then, sandwiched between those impossibly fudgy layers is this dreamy cream cheese frosting, studded with actual chunks of crushed Oreos. Seriously, every bite is a perfect mix of velvety cake, tangy frosting, and that nostalgic Oreo crunch. I first whipped this up for a friend’s birthday when I was craving something totally decadent but didn’t have a ton of time, and wow, did it deliver! It’s become my go-to for impressing guests without stressing myself out.
Why You’ll Love This Black Velvet Oreo Cake
Seriously, this cake is a dream come true for a few reasons:
- Incredible Flavor: It’s got that deep, dark chocolatey punch from the cocoa, balanced perfectly by a tangy cream cheese frosting.
- Amazing Texture: You get the super moist, velvety cake crumb and then those delightful little surprises of crunchy Oreos in every bite.
- Easier Than It Looks: Yes, it’s fancy, but the steps are straightforward, and you don’t need to be a pastry chef to nail it.
- Total Crowd-Pleaser: Who doesn’t love Oreos and chocolate cake? This is a guaranteed hit for parties, birthdays, or just because you deserve it.
- Visually Stunning: That deep black color with the creamy frosting and cookie bits makes for a seriously dramatic and beautiful dessert.
Ingredients for Your Black Velvet Oreo Cake
Alright, let’s get down to business with what you’ll need for this absolute stunner! Trust me, gathering these bits is half the fun, and having everything ready makes the whole process smooth sailing. Don’t worry if you don’t have *exactly* black cocoa powder; a good dark regular cocoa powder will work wonders too, but that black stuff? It gives you that *extra* dramatic color I love.
For the Cake:
- 2 cups All-purpose flour
- 2 cups Granulated sugar
- 3/4 cup Unsweetened cocoa powder (dark or black cocoa powder is best for that deep color!)
- 2 tsp Baking soda
- 1 tsp Baking powder
- 1 tsp Salt
- 1 cup Buttermilk
- 1/2 cup Vegetable oil
- 2 large Eggs
- 1 tsp Vanilla extract
- 1 cup Hot coffee (or hot water if you’re not a coffee fan!)
For the Frosting and Filling:
- 8 oz Cream cheese, softened (make sure it’s nice and soft!)
- 1 cup Unsalted butter, softened (don’t skip the softening step!)
- 3 cups Powdered sugar, sifted (sifting makes it super smooth, I promise)
- 1 tsp Vanilla extract
- 1/2 cup Oreo cookie crumbs, plus extra for topping (these are your little flavor bombs!)
Step-by-Step Guide to Making Black Velvet Oreo Cake
Alright, let’s get this party started! Making this black velvet Oreo cake is totally doable, and honestly, it’s really satisfying seeing it come together. Just follow these steps, and you’ll have a masterpiece in no time. Remember, the key is to just have fun with it and not stress too much! You can get a head start on some of the cake basics with tips like these found in a great one-bowl chocolate cake recipe.
Preparing the Cake Batter
First things first, get that oven preheated to 350°F (175°C). You’ll want to grease and flour two 9-inch round cake pans – I like to line the bottoms with parchment paper too, just for extra insurance against sticking! Now, in a big bowl, give your flour, sugar, cocoa powder, baking soda, baking powder, and salt a good whisk. It helps everything get distributed really evenly. Then, add in the buttermilk, oil, eggs, and vanilla. Mix it with your electric mixer on medium speed until it’s *just* combined. Seriously, don’t go crazy mixing here; we don’t want a tough cake! The batter will look a little thin, and that’s totally okay—it’s supposed to! Pour in that hot coffee (or water) and mix on low until it’s smooth. See? Easy peasy!
Baking and Cooling the Cake Layers
Divide that luscious batter evenly between your two prepared pans. Pop them into your preheated oven and bake for about 30 to 35 minutes. You’ll know they’re ready when a wooden pick you stick in the center comes out clean. Let the cakes hang out in the pans for about 10 minutes to cool down a bit before you flip them onto a wire rack. Make sure they’re *completely* cool before you even think about frosting them, or you’ll have a melty mess!
Making the Cream Cheese Frosting
While the cakes are doing their thing, let’s whip up that dreamy frosting. In a mixing bowl, beat your softened cream cheese and softened butter together until they’re super smooth and creamy. You don’t want any lumps! Gradually add in the sifted powdered sugar and vanilla extract. Keep mixing until it’s all light and fluffy. This is where the magic happens: gently fold in that 1/2 cup of crushed Oreos. Try to get them distributed evenly so every bite has a little cookie bit!
Assembling Your Black Velvet Oreo Cake
Okay, the moment of truth! Place one of your completely cooled cake layers on your serving plate or cake stand. Spread about one-third of that glorious Oreo cream cheese frosting all over the top. Then, carefully place the second cake layer on top of that. Now, use the rest of the frosting to cover the top and sides of your entire cake. Don’t worry about it being perfectly smooth; a little rustic look is charming! Finally, sprinkle that extra crushed Oreo goodness all over the top. Ta-da! Instant showstopper.

Tips for the Perfect Black Velvet Oreo Cake
Okay, so you’ve got all your ingredients ready, and you’re about to dive in. A few little secrets from my kitchen to yours can make all the difference in getting this Black Velvet Oreo Cake looking and tasting absolutely perfect. First off, make sure your butter and cream cheese are *properly* softened for that frosting – I’m talking room temperature, not microwaved hot, or it’ll be too greasy. Also, when you’re mixing the cake batter, resist the urge to keep going after everything is just combined. Overmixing is the enemy of a tender cake, trust me on this one! And for that gorgeous deep black color? Using black cocoa powder is key, but if you can only find regular dark cocoa, don’t sweat it; it’ll still be delicious!
Ingredient Notes and Substitutions
A few little ingredient tweaks can really make this Black Velvet Oreo Cake sing! For that intense, dramatic black color we’re going for, using black cocoa powder – yes, it’s a thing! – is your best bet. It gives a deeper, richer hue than regular cocoa. If you can’t find it, a good quality dark cocoa powder will still make a beautiful, dark chocolate cake. Need a buttermilk substitute? No problem! Just put a tablespoon of lemon juice or white vinegar in a measuring cup, fill it with regular milk to the 1-cup line, and let it sit for about 5 minutes. And for the Oreos? Any classic chocolate Oreos work perfectly for crushing into the frosting and for topping – just make sure they’re off the cream filling!

Frequently Asked Questions about Black Velvet Oreo Cake
Got questions about making this epic Black Velvet Oreo Cake? I get it! This cake is pretty special, and you want it to turn out just right. Here are some things people often ask:
Can I make this black velvet Oreo cake ahead of time?
Oh, absolutely! You can bake the cake layers up to two days in advance and wrap them tightly in plastic wrap once completely cool. The frosting can also be made a day ahead and stored in the fridge. Just let it soften a bit and give it a quick re-whip before you frost the cake!
How do I store leftover black velvet Oreo cake?
This cake stays its best when stored in the refrigerator. Pop any leftovers into an airtight container or cover it well with plastic wrap. It’ll keep beautifully for about 3-4 days. Make sure to let it sit out for about 20-30 minutes before serving if it’s been chilled, so the frosting and cake get nice and tender again!
What’s the best way to get a truly black cake color?
For that super dramatic, “black velvet” look, the secret is really using black cocoa powder. It’s different from regular cocoa and has a much lower pH, which gives it that intense, dark color. Regular dark cocoa powder will still give you a lovely deep chocolate flavor, but for that true black, black cocoa is the way to go!
Estimated Nutritional Information
Now, about the numbers! Keep in mind that these are just estimates, as things can change a bit depending on the exact brands you use and how big you slice each piece. I’ve calculated this for about 12 servings. This Black Velvet Oreo Cake is definitely a treat, but it’s amazing for special occasions! For more ideas on balanced eating, you can check out my thoughts on balanced meals.
Per Serving (approximate):
- Calories: 450
- Fat: 20g
- Saturated Fat: 10g
- Cholesterol: 55mg
- Sodium: 350mg
- Carbohydrates: 65g
- Fiber: 2g
- Sugar: 45g
- Protein: 5g
Black Velvet Oreo Cake
Ingredients
Equipment
Method
- Preheat your oven to 350°F (175°C). Grease and flour two 9-inch round cake pans. Line the bottoms with parchment paper.
- In a large bowl, whisk together the flour, sugar, cocoa powder, baking soda, baking powder, and salt.
- Add the buttermilk, oil, eggs, and vanilla extract to the dry ingredients. Beat with an electric mixer on medium speed until just combined. Do not overmix.
- Carefully pour the hot coffee into the batter and mix on low speed until smooth. The batter will be thin.
- Divide the batter evenly between the prepared pans. Bake for 30 to 35 minutes, or until a wooden pick inserted into the center comes out clean.
- Let the cakes cool in the pans for 10 minutes before inverting them onto a wire rack to cool completely.
- To make the frosting, beat the softened cream cheese and butter together until smooth and creamy. Gradually add the powdered sugar and vanilla extract, beating until light and fluffy.
- Fold the 1/2 cup of Oreo cookie crumbs into the frosting.
- Once the cakes are completely cool, place one layer on a serving plate. Spread about one-third of the frosting over the first layer. Top with the second cake layer.
- Frost the top and sides of the cake with the remaining frosting. Sprinkle the top with additional crushed Oreos before serving.