

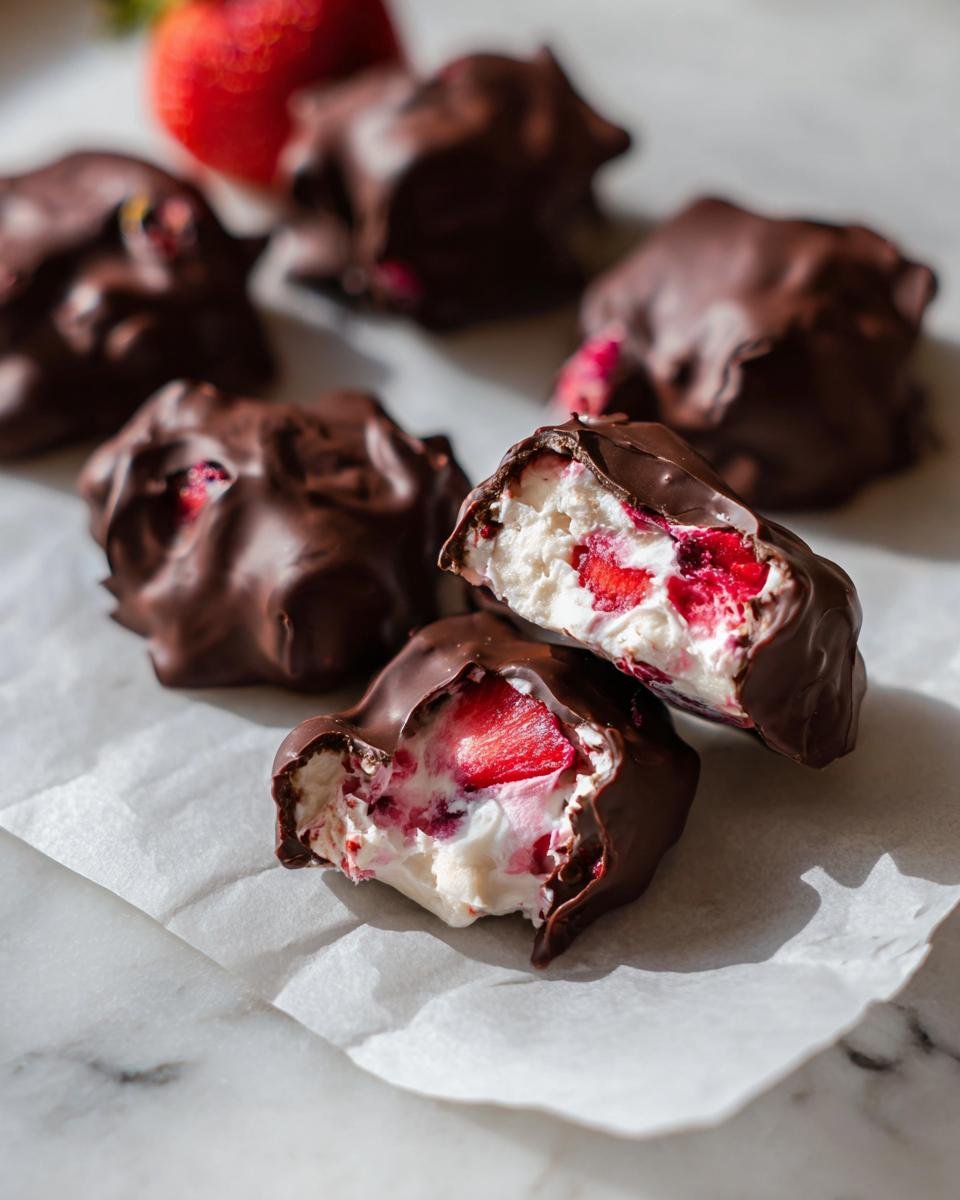
Okay, Valentine’s Day is right around the corner, and I know what you’re thinking—more fussy, sugar-loaded desserts, right? Nope! I say we keep things ridiculously easy and healthy this year. Seriously, you can pull off something gorgeous in about ten minutes of active time. I’ve been obsessed with making simple, fun freezer treats lately, and this one stole the show: the Chocolate-Covered Strawberry Yogurt Bark (Healthy Valentine’s Treat). It’s creamy, it’s tangy, and that little snap of frozen chocolate? Heaven!
Forget spending hours in the kitchen when you could be relaxing with your favorite person. This recipe is basically just putting delicious things on a sheet and tossing it in the freezer. I love making things that feel special but require zero oven time, especially when I’m feeling busy. These little clusters are packed with protein from the Greek yogurt, which means you get a little burst of sweet without all the guilt. Trust me, you’re going to want to keep a batch stashed in the freezer all winter!
Why You Will Love This Chocolate-Covered Strawberry Yogurt Bark (Healthy Valentine’s Treat)
- It’s so unbelievably fast! You only have about 10 minutes of actual hands-on time before it hits the cold zone.
- These are protein-packed thanks to the Greek yogurt, so they satisfy that sweet craving without the sugar crash later.
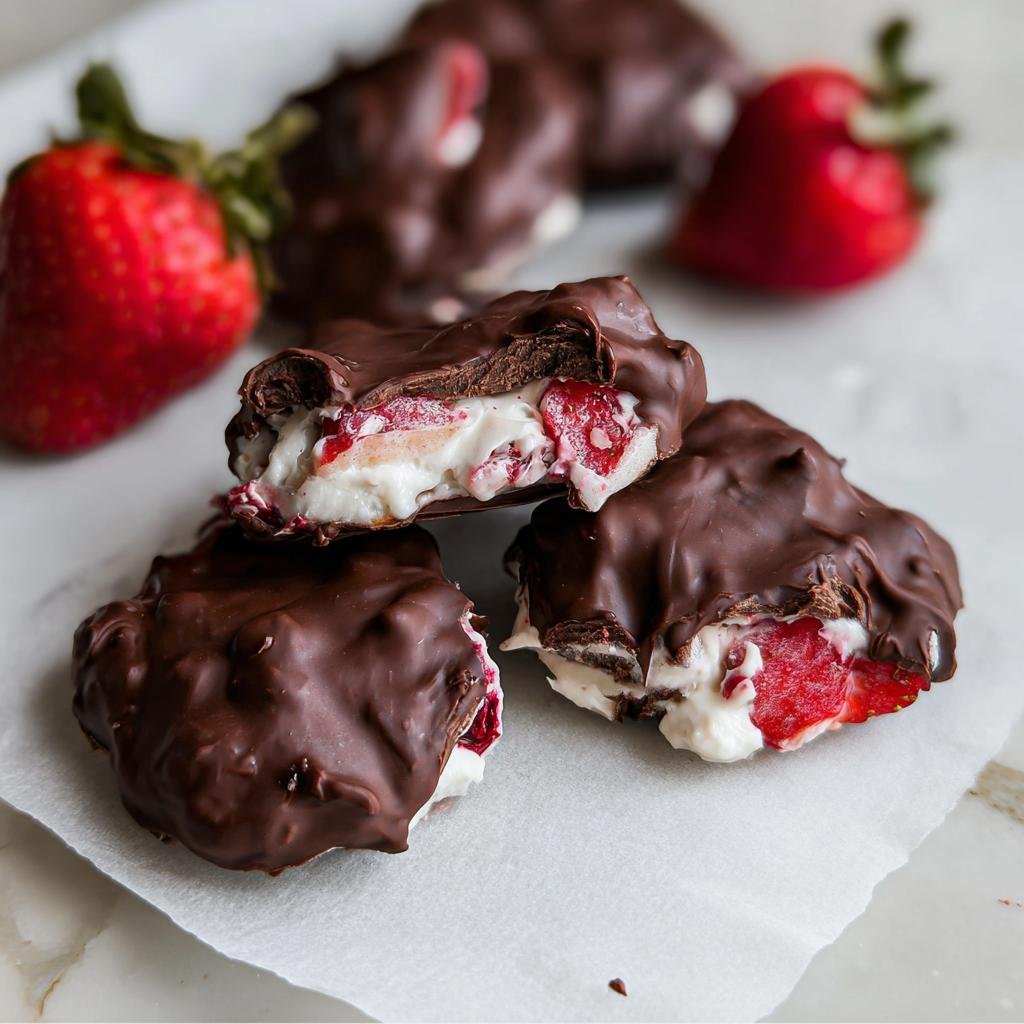
- Super festive looking! The vibrant pink from the strawberries tucked into the white yogurt is just darling for Valentine’s Day.
- No oven required—which means no worrying about scorching or babysitting a cake! Just mix and freeze.
- We are using wholesome ingredients here; check out more great healthy treats if you love clean eating!
- You can easily customize the chocolate swirl or even drop these on a fun platter for a beautiful presentation.
Seriously, when I need a quick dessert but don’t want to reach for store-bought junk, this is my go-to. It just feels really special!
Equipment Needed for Chocolate-Covered Strawberry Yogurt Bark
First things first, we need to get our tools ready. Laying everything out beforehand is my huge secret to staying organized in the kitchen! You don’t want to realize you forgot the parchment paper halfway through mixing the yogurt, trust me, that’s a mess you have to clean up.
For this recipe, since we aren’t actually baking anything, the setup is super simple. You’ll need:
- A large baking sheet. This is where everything comes together, so make sure it’s big enough to hold all your little yogurt dollops without them touching too much!
- Parchment paper. This is non-negotiable, folks. It keeps your clusters from sticking and makes cleanup a breeze.
- A large bowl for combining the yogurt and the strawberries. We need room to stir everything gently to coat those berries nicely.
- A smaller bowl, just for melting down that glorious chocolate coating later on.
- A microwave. We’re using this for quick chocolate melting, no double boilers needed here!
- A large spoon. We’ll use this for scooping the yogurt base onto the sheet and—most importantly—for dipping later!
See? So easy! Once you have these things out, you are basically 90% done with the work portion of the recipe!
Ingredients for Perfect Chocolate-Covered Strawberry Yogurt Bark (Healthy Valentine’s Treat)
I love how simple the ingredient list is for this treat. It really shows you don’t need seven different things to make something delicious and fun for a holiday. We keep the base super clean and then add a little bit of richness with the chocolate dip. Make sure you grab your ingredients before you start mixing, because once those berries hit the yogurt, we’re moving fast!
If you’re looking for more quick meal ideas that don’t take much time, you should definitely browse my collection of easy healthy recipes. But for now, let’s focus on our stars!
Yogurt Clusters
- 1 cup strawberries, diced (stems removed)
- 1/2 cup plain Greek yogurt – this has to be Greek yogurt, it’s much thicker!
- 1 tsp vanilla extract
Chocolate Coating
- 1 cup semisweet chocolate chips
- 2 tsp coconut oil – this is what makes the chocolate shell perfectly thin and snaps nicely when you bite it!
That’s it! See? No fancy sweeteners or complicated flavorings required. The natural sweetness of the strawberries and the slight richness of the semisweet chocolate do all the heavy lifting here.
Step-by-Step Instructions for Making Chocolate-Covered Strawberry Yogurt Bark
Remember how I said this was fast? Well, here’s where we prove it! The beauty of this whole process is that the active time is short, and the freezer does all the hard work for us. Just follow these steps carefully, and you’ll have a tray of icy Valentine’s goodness ready in under an hour!
If you need some quick ideas for weeknight meals while these are freezing, check out some of my favorite quick low-carb recipes to get ideas flowing!
Preparing the Yogurt Base and Freezing
- First, grab that big baking sheet and line it completely with parchment paper. If you skip this, you’ll be scraping yogurt for days, so don’t skip it!
- In your large bowl, gently combine the diced strawberries, the half-cup of lovely thick Greek yogurt, and the vanilla extract. You only want to stir this enough so that all those pretty strawberry chunks get coated. Don’t overmix!
- Now for the fun part: portioning! Scoop dollops of the strawberry-yogurt mix onto your parchment-lined sheet. Imagine them as little islands. You want about two tablespoons per island, and please leave some space between each one—like they need personal bubbles! You should end up with about 8 nice clusters sitting there.
- Pop that whole baking sheet into the freezer for a solid 30 to 45 minutes. They need to be firm, but we don’t want them totally rock-solid yet, or they’ll break when we dip them.
Melting the Chocolate Coating for Your Chocolate-Covered Strawberry Yogurt Bark
Once you have about 10 minutes left on the freezer timer, it’s time to get that gorgeous chocolate ready. This is where we turn “healthy yogurt dots” into amazing Chocolate-Covered Strawberry Yogurt Bark (Healthy Valentine’s Treat)!
- In your small, deep bowl—deep is better for dipping, trust me—toss in the cup of chocolate chips and those 2 teaspoons of coconut oil.
- We are melting this gently in the microwave. Use 30-second bursts. After each 30 seconds, take it out and give it a really good stir. The coconut oil helps it stay smooth and glossy. Keep doing this until it’s completely smooth with no chunks left.
Dipping and Setting the Final Chocolate-Covered Strawberry Yogurt Bark
This part requires speed! You want the yogurt clusters cold, but you don’t want the chocolate to seize up or harden before you dip them all.
- When the timer goes off, pull the tray out. Have your melted chocolate ready to go! You might want to melt the chocolate in two batches if you think the first batch will start to solidify while you’re dipping all eight clusters.
- Take one frozen cluster and quickly dip it into the melted chocolate using your large spoon. Try to get it completely covered!
- Lift it out, let any major excess drip off, and immediately place it back onto the parchment paper. Repeat this dipping dance quickly for the remaining frozen bites.
- Just let them sit out for about five minutes. The cold yogurt will make that melted chocolate shell harden up beautifully, and voilà, you’re ready to eat!
Tips for Success Making Your Chocolate-Covered Strawberry Yogurt Bark
I’ve made this recipe enough times now that I’ve figured out the tiny things that make the difference between a good batch and the absolute best batch. These aren’t in the main steps because they’re my little expert tricks for keeping things tidy and ensuring that perfect snap!
For more ideas on easy, healthier snacks, you can always check out my favorites for healthy snacks for kids—these bark clusters often make an appearance there!
Controlling the Yogurt Consistency
This is the biggest make-or-break moment! You absolutely must use full-fat or 2% Greek yogurt. Do not grab regular, thinner yogurt, or you’ll end up with yogurt puddles instead of firm clusters. If your Greek yogurt seems a little looser than you’d like, here’s my hack: stir in just one extra teaspoon of yogurt powder, or even a tiny spoonful of chia seeds, about five minutes before scooping. This gives it body and structure so it holds its shape beautifully when frozen.
Managing the Dip Speed
When you take the clusters out of the freezer for dipping, you need to get moving! If they sit on the counter warming up for even two minutes, the cold yogurt starts to sweat against the warm, melted chocolate, and you get that chalky, weird texture instead of a smooth shell. Work in batches of two or three clusters at a time. Dip, place back on the sheet, and immediately put the tray back in the freezer while you finish the rest of the chocolate melting or dipping process. Speed keeps the texture perfect!
The Magic of Coconut Oil
Don’t skimp on the coconut oil specified for the chocolate coating! People sometimes try to leave it out when they melt chocolate chips, but that oil is essential. It lowers the melting point of the chocolate just enough so it becomes wonderfully runny without getting chunky, and when it hits that frozen surface, it sets up into that thin, crisp shell we all love. If your melted chocolate looks too thick to truly coat the berry bits, add just a few more drops of coconut oil until it flows nicely off your spoon.
Ingredient Notes and Substitutions for Chocolate-Covered Strawberry Yogurt Bark
I get asked all the time about swapping out ingredients, especially when making something healthy like this Chocolate-Covered Strawberry Yogurt Bark (Healthy Valentine’s Treat). It’s great to customize, but for this one, a few ingredients really need to stay put, or you risk ending up with soup instead of clusters!
I’ve got a great backup recipe for ultra-soft banana bread using Greek yogurt if you ever want to see how versatile it is; check out my Greek Yogurt Banana Bread recipe for a great example! But for this bark, let’s focus on why the Greek yogurt here is so important for freezing. It has the right protein structure to hold its shape under the snap of that chocolate shell. If in doubt, stick to the recipe!
Why We Need Greek Yogurt, Not Regular
If you only have regular plain yogurt, please try to save it for a smoothie instead of this bark. Regular yogurt is too watery! When it freezes, it becomes icy and separates, making a slushy mess when you try to dip it. Greek yogurt, especially the full-fat or 2 percent kind, has much of that excess whey strained out, making it thick like sour cream. This thickness is what lets you scoop it into a defined little mound that actually freezes solid enough to coat.
Alternative Berries and Fruits
Strawberries are the iconic Valentine’s choice, but hey, we can always switch things up! You can absolutely substitute your diced strawberries with other firm, diced fruits. Raspberries tend to be a bit too soft and watery once they thaw slightly, so I shy away from those for this frozen treat. If you want a different color, try finely diced kiwi or even mango chunks! Just make sure whatever you use is diced small, no bigger than the size of a dried pea, otherwise, your clusters won’t hold together when dipped.
Chocolate Chip Choices
I specified semisweet chocolate chips because they offer that perfect blend of melt quality and flavor depth to balance the tart yogurt base. If you want to make this extra low-sugar, feel free to swap them out for dark chocolate chips (70% cacao or higher) or even sugar-free chocolate chips. Just be careful; those sugar-free varieties sometimes contain different stabilizers, so make sure you add a few extra drops of coconut oil if the melted coating seems too thick. We want smooth dipping!
Storage and Make-Ahead Options for Chocolate-Covered Strawberry Yogurt Bark
The best part about this recipe, truly, is that it is actually supposed to be made ahead of time! Unlike regular baking, everything here improves with a little chilling. Since these are literally frozen yogurt clusters, the freezer is their natural home, and honestly, they taste better when they’ve had a good, long freeze.
If you are planning a party or just want snacks ready for the week, you can absolutely whip up a double batch whenever you have a random 10 minutes free. I love doing this on a Sunday afternoon while I’m tackling my weekly meal prep; it’s just one more thing ticked off the list, and I have dessert ready for days!
The Best Way to Store Your Yogurt Bark Clusters
Forget the fridge; these need to stay solidly frozen. The fridge will cause them to get soft, watery, and the chocolate shell might start to pull away from the yogurt as they sweat. Once the chocolate shell has hardened completely (give them at least an hour in the freezer after dipping), it’s time to package them up!
You want an airtight container. A rigid, freezer-safe plastic container works perfectly because it prevents external pressure from crushing your beautiful little clusters. However, if you just stack them directly in the container, that chocolate shell might stick to the cluster underneath it. Nobody wants that!
Here’s what I always do: Use squares or strips of parchment paper, or even wax paper, and place one piece between every single layer of clusters. Layer them gently, paper between each level, seal tight, and pop it back into the deepest, coldest part of your freezer. They stack up nicely and stay perfectly separated!
How Long Do They Last in the Freezer?
Because we are using quality Greek yogurt and the chocolate coating seals in a lot of the moisture, these last astonishingly long in the freezer. I’ve kept them in that airtight container with parchment layers for up to three weeks with absolutely no noticeable difference in texture or flavor. They really hold up well!
If you go past the three-week mark, they still aren’t *unsafe* to eat, but sometimes the yogurt can start to become a little bit more icy or crystalline, you know, that classic freezer texture. For peak freshness and that perfect soft-yet-frozen bite, I aim to enjoy them within 14 days. You’ll likely eat them all before then anyway!
Make-Ahead Strategy for Holiday Prep
If you’re prepping for a big Valentine’s celebration, plan backward! Because you need that 30–45 minutes of initial freezing time, and then another 10 minutes for dipping, plus a final 5 minutes for setting, make sure you budget at least an hour of prep time total, even though the active work is minimal. You can easily make them 2 or 3 days before your holiday event, store them sealed in the freezer, and just pull them out about 5 minutes before serving. No last-minute kitchen stress required!
Frequently Asked Questions About Chocolate-Covered Strawberry Yogurt Bark (Healthy Valentine’s Treat)
I know you might have a few lingering questions before you dive into making these! It’s normal when you’re trying something new, especially when you’re relying on the freezer for the cooking process. I’ve tried to answer the most common things I hear people ask about making the perfect Chocolate-Covered Strawberry Yogurt Bark (Healthy Valentine’s Treat).
Can I use regular yogurt instead of Greek yogurt?
Oh, I really wouldn’t advise it, sweetie! Regular yogurt is just too thin and watery. When you freeze it, it turns icy and separates, and it won’t hold that neat little scoop shape for dipping. You end up with messy puddles. For this bark, you really need the thickness and high protein content of Greek yogurt—that’s what gives you that perfect, creamy yet firm texture after freezing. If you must substitute, try Icelandic Skyr, which is similar, but skip the thin stuff!
How long do these Chocolate-Covered Strawberry Yogurt Bark clusters last in the freezer?
They last a surprisingly long time because they are super frozen! If you keep them sealed tightly in an airtight container with parchment paper separating the layers—which I highly recommend—they stay fantastic for about three weeks. Honestly, I’ve probably eaten batches that are older than that, but for the absolute best texture where the chocolate snaps perfectly, I try to eat them within two weeks.
Can I add things like nuts or sprinkles to the Chocolate-Covered Strawberry Yogurt Bark?
Absolutely! This is where you can really customize it for Valentine’s Day or any other occasion. After you dip them in the chocolate, before the chocolate sets, you can sprinkle on chopped pistachios, mini chocolate sprinkles, or even freeze-dried raspberry dust. Just make sure to add any toppings immediately after dipping, because that chocolate hardens fast once it hits the cold yogurt!
My chocolate coating looks dull after I dipped the clusters; did I do something wrong?
Don’t panic if that happens! A dull, chalky look usually means the chocolate cooled too slowly, or perhaps you didn’t use enough coconut oil. The coconut oil is key for that glossy finish. If your chocolate looks sad, try reheating it for 10 more seconds and stirring vigorously while adding literally one more drop of coconut oil. Also, remember that the faster the cold clusters hit the warm chocolate, the better the final look will be. If you’re into more advanced low-sugar baking ideas, you might want to look at some of my keto sweets recipes where chocolate consistency is a real game-changer!
Serving Suggestions for Your Healthy Valentine’s Treat
We’ve made these gorgeous little frozen bites, and I think they deserve a nice debut! Since these are the main event for a simple holiday treat, how you present them makes a huge difference. Forget serving them straight out of the freezer bag; we want elegance, even if it only took us ten minutes to assemble!
I always try to incorporate a little color and texture onto whatever I serve them on. It really elevates the whole simple dessert experience. If you are looking for more ways to bring joy back into your everyday kitchen routine, go check out the posts in my joyful eating section for some happy inspiration!
The Perfect Platter Presentation
This is my favorite way to present them, especially when I’m serving guests or my family after dinner. Get out your prettiest small serving dish—maybe something white or marble if you have one. Don’t just drop them in a pile! Arrange them artfully. I like to arrange them in a loose spiral or even line them up neatly in two or three rows, making sure the chocolate-coated side is facing up so everyone can see that beautiful shine.
For a pop of color that really screams Valentine’s, try scattering a few fresh strawberry slices or a few raspberries around the edges of the platter. It balances the frozen texture with something fresh and juicy. It looks so intentional, even though you just pulled them from the freezer ten minutes ago!
Pairing with Beverages
Because these bites are cold, tangy, and feature rich chocolate, they pair wonderfully with a few different kinds of drinks depending on the time of day. If you’re serving these after lunch or as a light afternoon snack, a hot beverage is the perfect contrast.
I always serve mine with a piping hot cup of black coffee or maybe a simple herbal tea, like vanilla rooibos. The warmth of the drink against the icy snap of the yogurt bark is such a satisfying combination. If you’re feeling extra fancy, try a mug of rich, dark hot cocoa—the double dose of chocolate is never a bad idea, right?
Making Them a Date Night Dessert
If you’re making these as part of an evening wind-down, you can make them feel even more special. Instead of serving them frozen solid, take the container out of the freezer about 15 minutes before you plan to eat them. This allows the yogurt inside to soften just a bit, making it creamier, almost like a soft-serve texture, while the chocolate shell remains slightly snappy.
To make it truly romantic, I sometimes top the clusters *right* before serving with the tiniest drizzle of good quality melted white chocolate over the dark chocolate coating. I use a fork or a small piping bag with the tiniest tip. It creates a pretty, delicate crisscross pattern that looks professional but takes two extra seconds!
Nutritional Estimates for Chocolate-Covered Strawberry Yogurt Bark
Okay, listen up! Because this recipe is packed with Greek yogurt and relies on fruit for sweetness, it’s seriously light, but I always get asked about the numbers. Since we’re using standard pantry ingredients and making this at home, remember that these are just my best guesses based on averages. Your specific brands of yogurt and chocolate will change things slightly, so take this as a happy guideline, not a lab report!
If you are tracking your macros closely, you can always check out the resources in my diet and nutrition section for more balanced guides, but for this simple treat, here’s what I estimate for one cluster (based on 8 servings total):
- Calories: Roughly 110-130 per cluster. Isn’t that fantastic for a dessert?
- Fat: Around 6-7 grams. Most of this comes from the necessary coconut oil and the chocolate chips, but it’s low!
- Protein: About 7-8 grams. That’s the power of Greek yogurt coming through—it keeps you feeling full!
- Carbohydrates: Typically 12-15 grams. Most of this is natural sugar from the fruit and the small amount in the chocolate.
See? You get that gorgeous, frozen, chocolatey texture, but it’s sneaking in tons of protein and keeping the overall calorie count reasonable. That’s why I call this my guilt-free little indulgence—it fits right into a healthy eating plan without any fuss!
Share Your Chocolate-Covered Strawberry Yogurt Bark Creations
Oh my goodness, once you’ve made a batch of this simple, delicious, frozen goodness, I absolutely need to know what you think! Seeing your creations pop up online is genuinely the best part of sharing these recipes. It makes all the testing and scribbling down notes completely worth it.
Don’t be shy! Take a snap of your finished Chocolate-Covered Strawberry Yogurt Bark clusters—especially if you got creative with sprinkles or serving style—and tag me on social media! I always love seeing how you all adapt things in your own kitchens. I try to keep up with everyone, and seeing my recipes in your homes makes me feel like we’re all baking pals!
Rate This Healthy Valentine’s Treat
If you had a chance to whip up this recipe, I would be so grateful if you could leave a star rating right down below in the comments section. It really helps other readers know if this recipe is a keeper, and honestly, it helps me know what you want to see more of in the future! Give it 5 stars if you loved that crispy chocolate shell paired with the cool, tangy yogurt.
If you tried one of the twists, like using mango instead of strawberries, definitely mention that in your review! Hearing specific feedback about your substitutions is super helpful. And hey, if you want to check out the chef behind all these kitchen adventures, hop over to my About Me page to learn a little more about my cooking journey!
Did You Try Any Fun Toppings?
Now, I know I gave you a basic dipping guide, but I’m dying to know if anyone went wild with the toppings! Did you try a chocolate drizzle technique? Maybe you dusted them with cardamom or even a tiny bit of sea salt before the chocolate set? Tell me about it below!
Sometimes what I think is the perfect topping ends up being way too much work for a casual treat, so I love getting real-world feedback. If you found a way to make these even prettier or tastier than my original idea, share your secret weapons in the comments. We’re all learning together, right?
Chocolate-Covered Strawberry Yogurt Bark
Ingredients
Equipment
Method
- Line a large baking sheet with parchment paper.
- Place diced strawberries into a large bowl. Add Greek yogurt and vanilla extract. Stir everything together until the berries are coated in the yogurt.
- Scoop the strawberry-yogurt mixture onto a parchment-lined baking sheet. Make each cluster about 2 tablespoons worth. Leave space between each cluster. You should get about 8 clusters.
- Transfer the baking sheet to the freezer for 30 to 45 minutes. The yogurt clusters will freeze but remain soft enough to eat.
- With about 10 minutes left on the timer, place chocolate chips in a small bowl with coconut oil. Melt in the microwave in 30-second increments, stirring between each increment, until the chocolate is smooth.
- Remove frozen clusters from the freezer. Using a large spoon, quickly dip each cluster into the melted chocolate and place it back on the baking sheet. Repeat until all clusters are coated in chocolate.
- Allow the clusters to sit for a few minutes. The chocolate will harden into a shell and the treat will be ready to eat.