
Stop right there! If you think you know good hummus because you buy those little plastic tubs at the grocery store, you are missing out on LIFE! Seriously, I used to think store-bought was fine, but creating the Homemade Hummus Recipe from scratch changed my whole appetizer game. It’s wild how simple it is to turn chickpeas into something lighter than air, but richer than anything you find pre-made.
The biggest hurdle for home cooks is always texture. We want that velvety smoothness, right? I spent way too long trying to figure out why mine was always gritty. Trust me, once you master the chickpea cooking technique I’m about to show you, you’ll never go back. This recipe conquers grittiness and delivers the creamiest chickpea dip you’ve ever tasted.
Why This Homemade Hummus Recipe Works So Well
Okay, I need to let you in on the ‘secret’ to getting that impossibly fluffy hummus. It’s not magic, it’s just heat and time! Store-bought stuff is usually fine, but when you cook your chickpeas properly, the results are miles better. Seriously, we’re talking about next-level smoothness here. You definitely want to pay attention to these steps!
- You absolutely need the baking soda trick when you boil the chickpeas. It’s non-negotiable!
- Don’t be shy—cook those little guys until they are nearly falling apart. They need to be super weak!
- Ice water is your emulsifier BFF; it helps everything bind together without turning into a thick paste.
Achieving Ultra-Creamy Texture
The reason this Homemade Hummus Recipe defeats the gritty texture monster is that overcooking step I mentioned. When you boil them long enough—especially with that baking soda helping along—the chickpeas practically dissolve. You are softening the starches so much that when they hit the food processor, they literally melt into that beautiful, dreamy puree.
And don’t forget the ice water! Adding it slowly while the machine is running helps trap air and creates that perfect creamy emulsion, making your hummus airy instead of heavy. It’s all about technique, my friend!
Gathering Ingredients for Your Homemade Hummus Recipe
Alright, let’s talk supplies! You need quality ingredients if you want that restaurant-level dip at home. Don’t skimp on the tahini—that’s honestly my biggest tip right there. When you grab your tahini, pick a jar that looks runnier; if it’s super thick and separated at the bottom, you’ll need more ice water later, so keep an eye out!
Gather everything before you start, because once the food processor is running, you want to move quickly. It’s a pretty straightforward list, focusing mostly on fresh acid and good sesame paste. If you’re looking for more inspiration after mastering this, check out my favorite plant-forward recipes!
For the Hummus Base
- 1 can (15 ounces) chickpeas, rinsed and drained (or 1 1/2 cups cooked chickpeas). If using canned, grab that 1/2 teaspoon of baking soda.
- 1/4 cup fresh lemon juice (you might need up to 2 lemons worth).
- 1 clove of garlic, medium-to-large, roughly chopped.
- 1/2 teaspoon fine sea salt, plus more for tasting.
- 1/2 cup tahini—this is the powerhouse, so get a good one!
- 2 to 4 tablespoons of ice water—keep this handy!
- 1/2 teaspoon ground cumin.
- 1 tablespoon extra-virgin olive oil.
Optional Garnishes
These make the final presentation pop, so don’t ignore them if you have them on hand!
- A drizzle of olive oil or maybe even some zhoug sauce if you like heat!
- A sprinkle of ground sumac or paprika for color.
- A light sprinkle of chopped fresh parsley.
Essential Equipment for the Best Homemade Hummus Recipe
I know, I know, nobody loves pulling out extra gadgets, but for truly phenomenal hummus, you need these specific tools. Don’t worry, most of these are things you probably already have sitting around when you’re whipping up something tasty like a tahini-based dish. Having the right gear really cuts down on the processing time and ensures that super smooth finish we are chasing.
For this Homemade Hummus Recipe, I rely on texture, and texture relies on good processing power. If you skip a good machine, you’ll end up with that slightly chunky texture instead of creamy luxury. You’ll need:
- A medium saucepan—this is where the magic starts when we boil those chickpeas until they are tender.
- A fine-mesh strainer—you’ll use this to shock the chickpeas quickly with cold water after boiling.
- Your secret weapon: A food processor or a high-powered blender. A standard blender can sometimes struggle, so if you are using one, go slow!
- A simple serving bowl to show off your beautiful final product!
The food processor is where you spend the most time, so make sure the bowl and blade are clean and ready to go before you start the flavor base!
Step-by-Step Instructions for Your Homemade Hummus Recipe
This is where the magic really happens! Making incredible hummus isn’t about complicated steps; it’s about following the sequence exactly. I can’t stress this enough: the texture transformation will blow you away, especially if you follow my little trick for softening the chickpeas first. Make sure you have your food processor ready to go, because once we start blending the tahini, we move pretty quickly. If you want a delicious side, these steps work perfectly before you check out that chickpea bowl recipe!
Softening the Chickpeas
First things first, grab that saucepan! Put your chickpeas in there and make sure you add the baking soda—yeah, it feels weird, but trust me, it helps break them down. Cover them well with water and bring it to a rolling boil. You need to boil them for about 20 minutes until they look totally swollen and the skins are literally starting to slip off. Don’t just cook them until they’re warm; they must be soft!
Drain them through your fine-mesh strainer and rinse them under cold water for just a quick 30 seconds. We don’t need to peel them, thank goodness—that would take forever!
Preparing the Flavor Base
Next, grab the flavor core! Toss the lemon juice, your rough-chopped garlic clove, and the salt right into the food processor. Pulse that until the garlic is minced so finely it’s almost gone. Now, here’s a crucial pause: Let this mixture sit for about 10 minutes. This resting time is important; it mellows out the harshness of the raw garlic so it integrates beautifully into the final dip.
Creating the Creamy Emulsion
Once that garlic has mellowed, add your tahini and turn the processor on. Let it run for a minute, scraping down the sides. Then, very slowly, start drizzling in the ice water—start with 2 tablespoons. You’ll see the mixture suddenly get thick, almost pasty, and then suddenly it will transform into this pale, fluffy cloud. If it seems stiff, add one or two more tablespoons of that ice water until it’s ultra smooth.
Final Blending and Seasoning
Now, throw in the cumin and those wonderfully overcooked chickpeas. Drizzle in the olive oil while it’s blending. Process everything for at least 2 minutes, scraping down the sides frequently so you don’t have any chunky spots hiding! Once it looks fully combined and creamy, you have to taste it. If it’s missing that North African ‘zing,’ add more lemon juice. Need more depth? Add a tiny pinch more salt until it sings!

Tips for Success with Homemade Hummus Recipe
Okay, you’ve successfully processed your *Homemade Hummus Recipe*, but maybe it’s looking a little sad, or maybe it’s perfect and you want to know how to guarantee perfection next time! Don’t sweat it; hummus is forgiving, but these little tips will take yours from good to show-stopping. Remember how I talked about tahini quality? That’s key to knowing how much liquid you’ll need.
If you’re buying tahini and notice it’s really thick in the jar, almost glue-like, that means it’s dense. When you add that dense paste, you’ll need more ice water during the blending stage to get that light emulsion going. On the flip side, if your tahini separates immediately into runny oil and thick sediment, you might use less water initially. You have to get a feel for it!
Also, don’t be afraid to taste and adjust! We put salt and lemon in there, but often, it needs a tiny extra pinch of salt right at the end to really make the sesame flavor pop. It’s a little hack I learned when snacking on hummus all the time—you can find some of my favorite healthy snack ideas while you’re waiting for the tahini to incorporate!
Tahini Quality Matters
I can’t stress this enough: the tahini selection is like choosing your best olive oil; it sets the stage. Good tahini should be ground sesame seeds, smooth, and pourable, but not watery. If you use a super dry, thick tahini, you absolutely must be patient while adding that ice water slowly. Rushing it will just make the whole mixture seize up solid! You’re looking for that sweet spot where the high-speed blending incorporates the water smoothly, turning that pasty tahini into a fluffy, pale dream before you even add the chickpeas.
Serving Suggestions for Homemade Hummus Recipe
Now that you’ve got the creamiest, dreamiest homemade hummus, what do you do with it? You don’t just eat it with a spoon, although trust me, I’ve been tempted! Traditionally, you need warm pita bread, that’s a given. But you can get so much fancier with the dipping tools.
I love piling this on a platter. Grab some crisp cucumber slices, bright bell pepper strips, and maybe some crunchy carrot sticks. For a really fun spread, check out my tips for putting together a budget veggie tray and load it up with this dip in the center. Always serve it with a generous drizzle of good quality olive oil right before it hits the table!
Storing Leftovers of Your Homemade Hummus Recipe
Don’t panic if you actually have any hummus left over later—though honestly, I rarely do! But for those rare occasions when you don’t devour the entire batch right away, storage is super simple.
The biggest thing you need to remember is that this is fresh stuff, so it needs to stay cold. Just scrape any leftover hummus back into an airtight container. You don’t want it sitting out on the counter for too long, especially with the fresh lemon juice in there.
My rule of thumb is that homemade hummus lasts great in the refrigerator for up to a week if it’s sealed up tight. If you plan on prepping a big batch ahead of time, make sure your container is completely sealed to keep out any fridge smells. If it starts to look a little dry after a couple of days, just stir in a teaspoon of fresh lemon juice or a tiny splash of cooled water right before serving to bring back that creamy texture. Easy peasy!
Frequently Asked Questions About Homemade Hummus Recipe
When you’re diving into making your own dip, questions pop up, and that’s totally normal! Mastering the Homemade Hummus Recipe is all about tweaking things until it tastes exactly how *you* like it. Here are some of the things folks ask me most often about getting that perfect texture and flavor balance, especially if you are looking for something that works well with those low-carb snack ideas!
Can I skip cooking the canned chickpeas?
Oh, please don’t! I hear this one all the time. You really shouldn’t skip boiling those canned chickpeas with the baking soda, even though they are technically pre-cooked. Those canned ones are just cooked enough to be safe, but they aren’t soft enough to break down fully in your machine. If you skip this 20-minute simmer, you’re going to end up with that gritty hummus texture we worked so hard to avoid. We need them mushy to get that smooth coating for the best Homemade Hummus Recipe!
My hummus is too thick, what should I add?
Don’t panic; this is easy to fix! If you’ve processed it all, and it looks more like a paste than a smooth dip, you just need liquid. Remember that ice water we kept on hand? Turn your food processor back on low and slowly drizzle in ice water, one tablespoon at a time. You’ll watch it transform right before your eyes into something lighter and silkier. Be patient and add it slowly; you can always add more, but you can’t take it out!

Estimated Nutritional Data for Homemade Hummus Recipe
I always get a little nervous sharing this part, because nutrition facts are estimates, right? I mean, I don’t use a scale to measure my tahini down to the single gram! But I know many of you track things, so I jotted down what our testing showed for a standard serving size, based on the ingredients listed in this Homemade Hummus Recipe.
Keep in mind that these figures assume you’re dividing the batch into 6 standard servings. Adding extra olive oil for drizzling or using a different brand of tahini will shift these numbers slightly. It’s all part of the fun when you’re cooking from the heart! For more insights on making smart choices in the kitchen, peek at my favorite diet and nutrition tips.
Here is the breakdown based on the recipe proportions:
- Calories: About 180 per serving (Wow, that’s low for how satisfying this dip is!)
- Fat: Around 10 grams
- Protein: Roughly 6 grams
- Carbohydrates: About 18 grams
It’s amazing that something so rich in flavor only clocks in at 180 calories for a good helping. That’s why I feel great about serving this homemade chickpea dip to everyone—it’s satisfying without being heavy!

Homemade Hummus Recipe
Ingredients
Equipment
Method
- Place the chickpeas in a medium saucepan and add the baking soda. Cover the chickpeas by several inches of water, then bring the mixture to a boil over high heat. Continue boiling, reducing heat if necessary to prevent overflow, for about 20 minutes, or until the chickpeas look bloated, their skins are falling off, and they are quite soft.
- In a fine-mesh strainer, drain the chickpeas and run cool water over them for about 30 seconds. Set aside. You do not need to peel the chickpeas for this recipe.
- Meanwhile, in a food processor or high-powered blender, combine the lemon juice, garlic, and salt. Process until the garlic is very finely chopped, then let the mixture rest so the garlic flavor can mellow, ideally 10 minutes or longer.
- Add the tahini to the food processor and blend until the mixture is thick and creamy. Stop to scrape down any tahini stuck to the sides and bottom of the processor as needed.
- While running the food processor, drizzle in 2 tablespoons ice water. Scrape down the food processor, and blend until the mixture is ultra smooth, pale, and creamy. If your tahini was extra-thick, you might need to add 1 to 2 tablespoons more ice water.
- Add the cumin and the drained, over-cooked chickpeas to the food processor. While blending, drizzle in the olive oil. Blend until the mixture is super smooth, scraping down the sides of the processor as needed, about 2 minutes. Add more ice water by the tablespoon if necessary to achieve a super creamy texture.
- Taste, and adjust as needed. You may want to add another 1/4 teaspoon salt for more flavor and another tablespoon of lemon juice for extra zing.
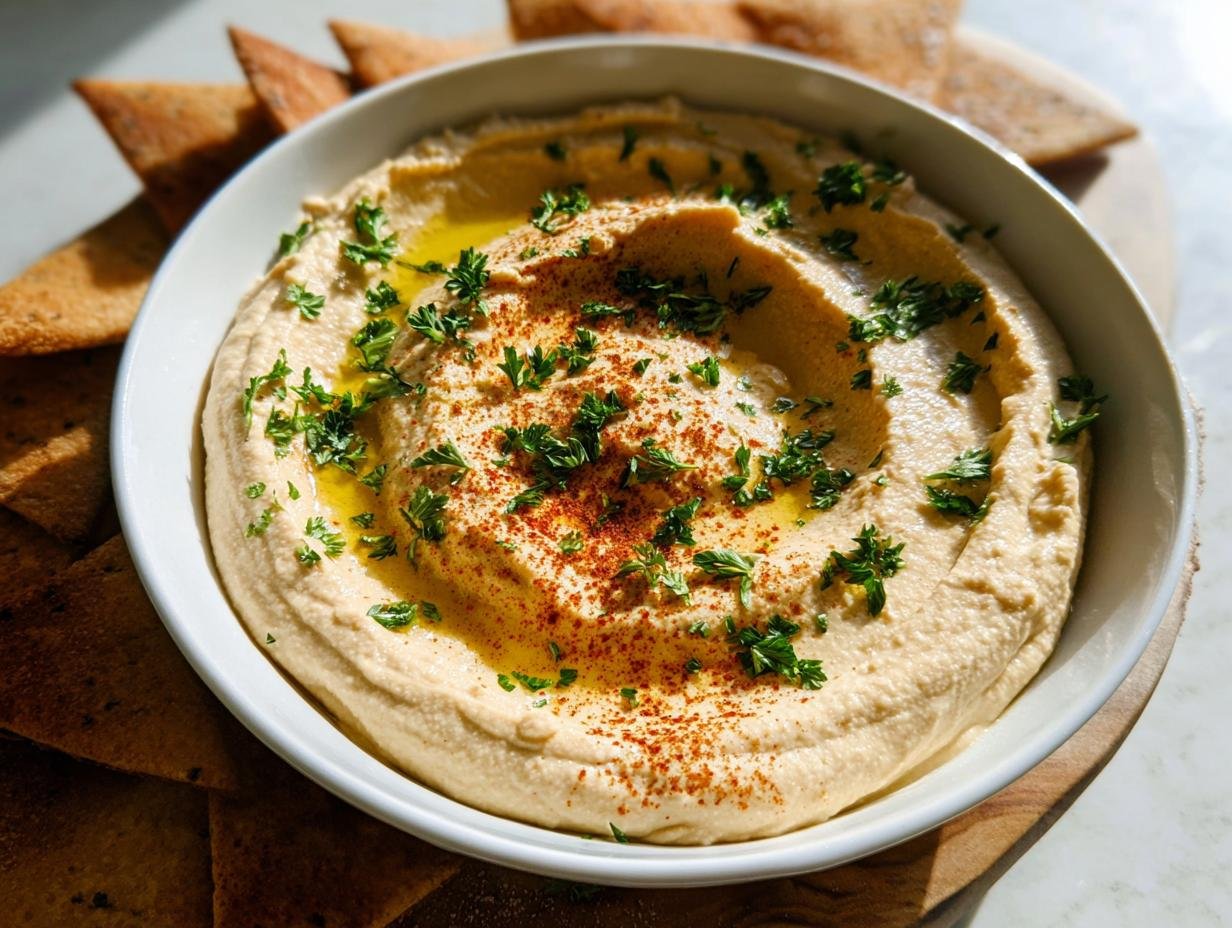
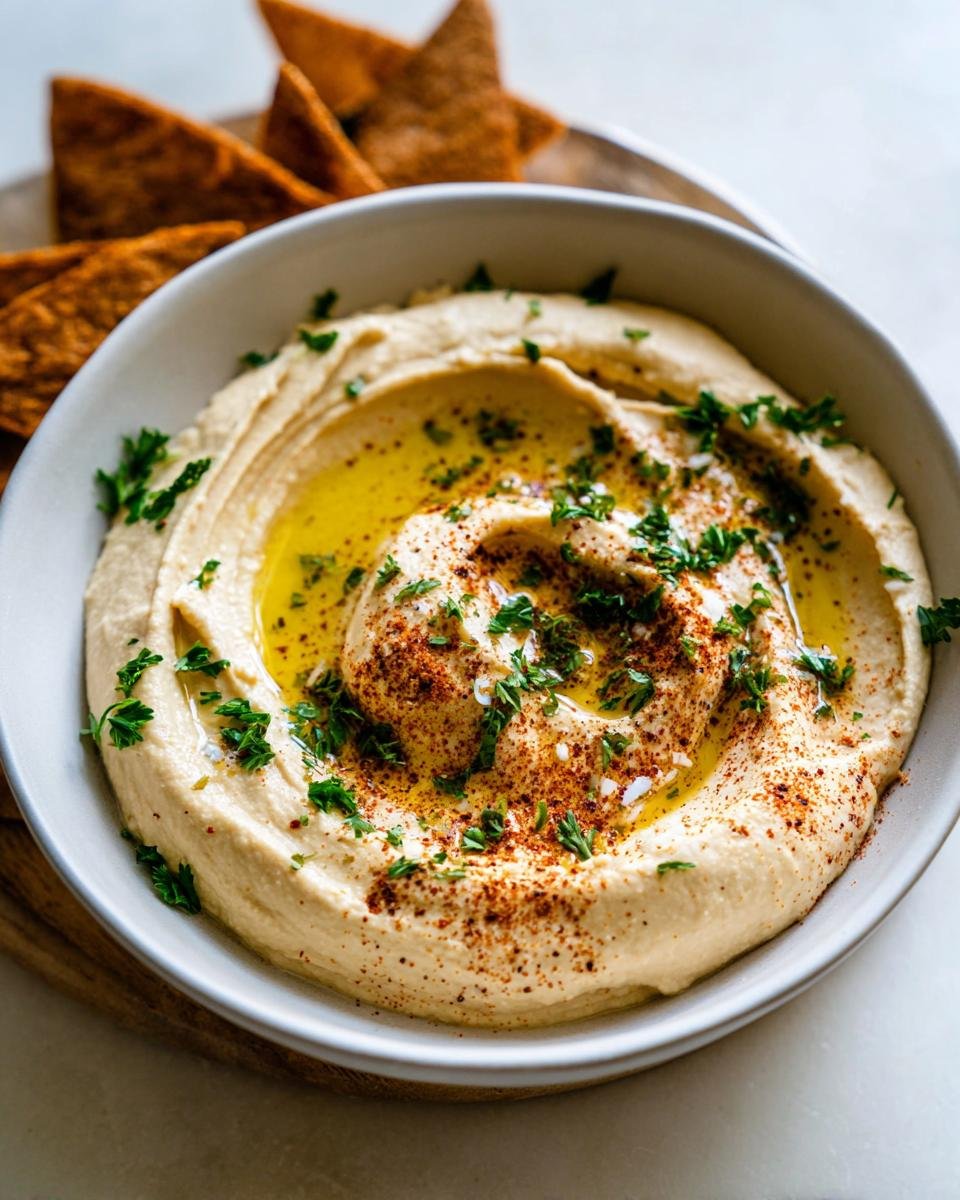
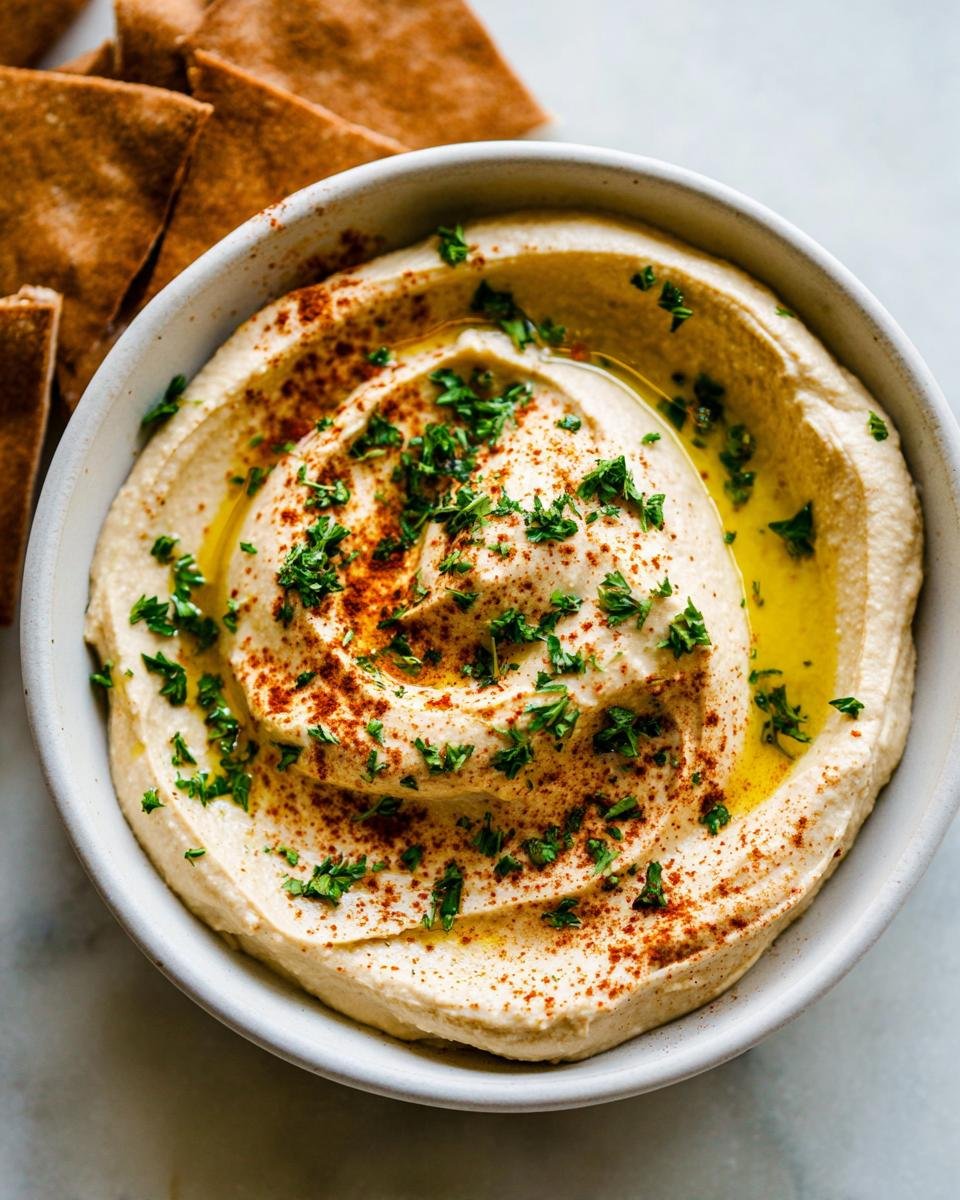
- Scrape the hummus into a serving bowl or platter, and use a spoon to create swooshes on top. Top with your choice of garnishes, and serve. Leftover hummus keeps well in the refrigerator, covered, for up to 1 week.