
Ooh, St. Patrick’s Day is just around the corner, and you KNOW what that means! It’s time for all things green, and for me, that absolutely includes bringing back the magic of the iconic Shamrock Shake. But let’s be real, sometimes you want that creamy, minty goodness in a more fun, shareable format. That’s where these amazing Shamrock Shake Pudding Cups come in! They’re seriously the easiest, most delightful little treats, perfect for getting the whole family involved, little leprechauns and all. I remember making these with my niece last year, and her giggles trying to get the green just right… priceless! These pudding cups capture all the flavor you love from the shake but in a totally no-bake, super-quick dessert package. Trust me, they’re a total hit!
Why You’ll Love These Shamrock Shake Pudding Cups
Seriously, why wouldn’t you love these little cups of green magic? They’re just about the easiest, most delightful treat you can whip up. You get all that yummy minty-vanilla flavor you crave from the classic Shamrock Shake, but in a totally fuss-free pudding form. Plus, they’re super quick to make, which is a lifesaver when St. Paddy’s Day rolls around! The vibrant green color is just so festive, making them perfect for parties, school treats, or just a fun way to brighten up dessert time for the whole family. And the best part? The kids can totally help make them!
Ingredients for Your Shamrock Shake Pudding Cups
Alright, let’s get down to business! The best part about these Shamrock Shake Pudding Cups is how simple the ingredients are. You probably have most of them in your pantry right now! Here’s what you’ll need to pull off this St. Patrick’s Day magic:
For the Pudding Base:
- 1 (3.4 oz) package of instant vanilla pudding mix (This is our shortcut to creamy goodness!)
- 2 cups of nice and cold milk (Using cold milk is key for the pudding to set up right!)
- 1/2 teaspoon of peppermint extract (This is where that classic Shamrock Shake flavor comes from. Adjust a tiny bit more if you like it extra minty!)
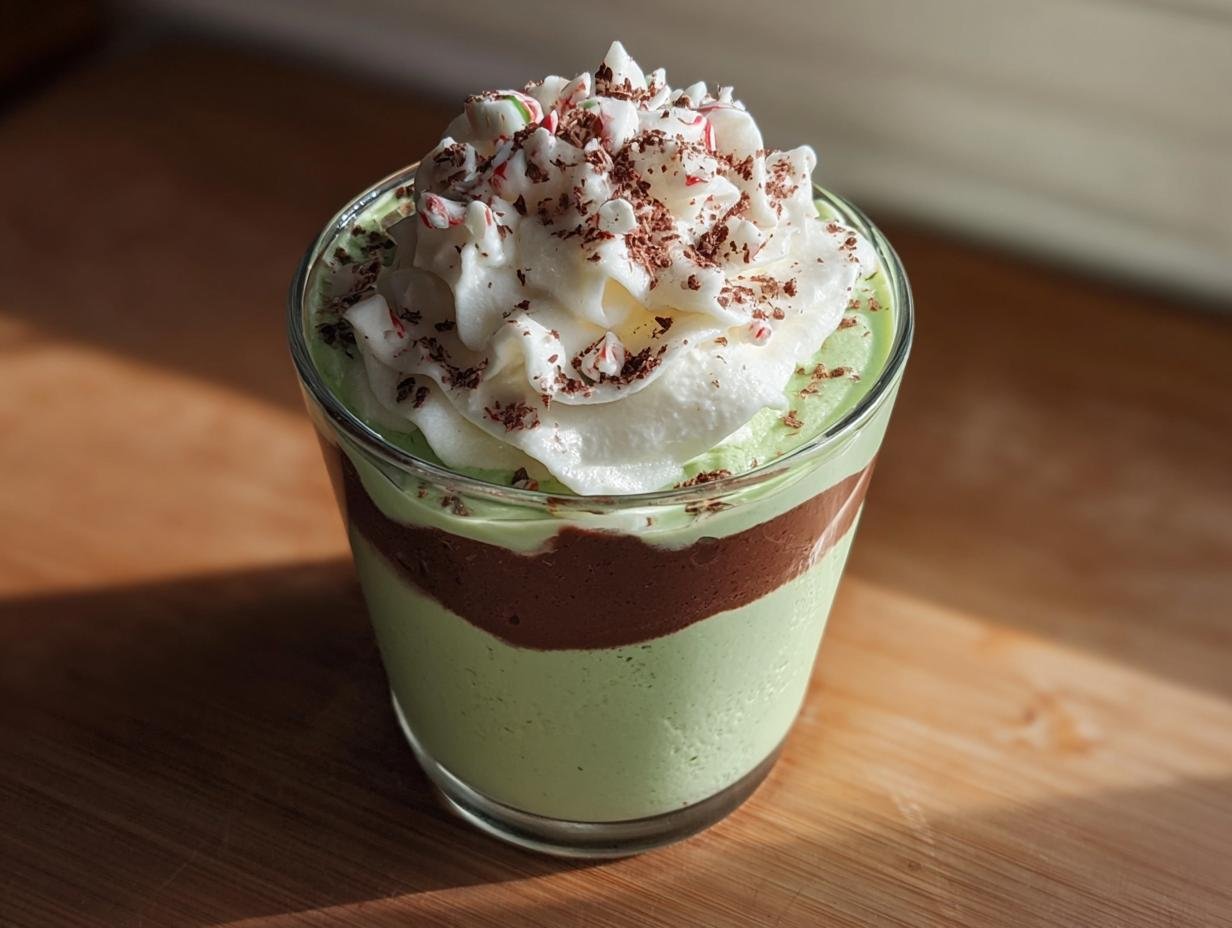
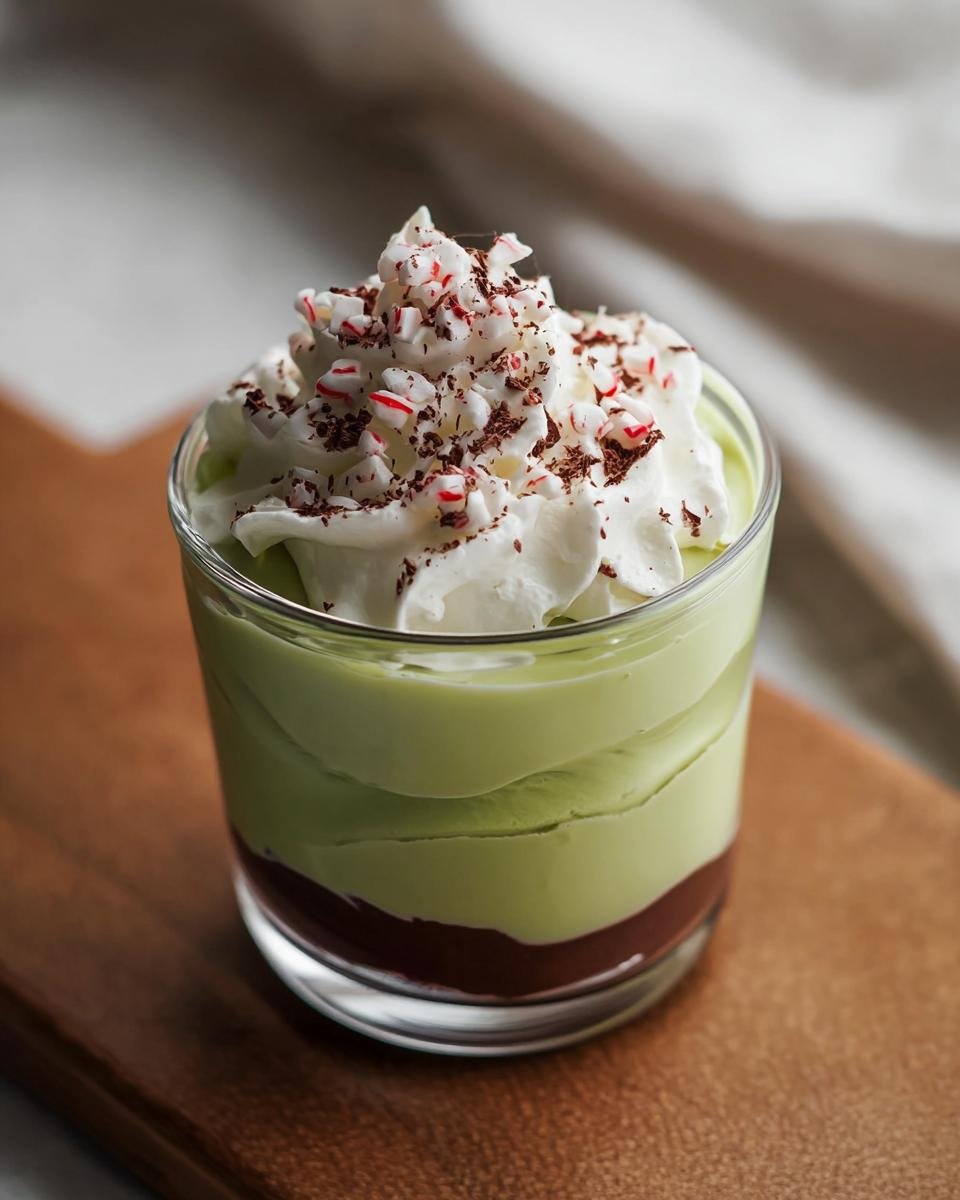
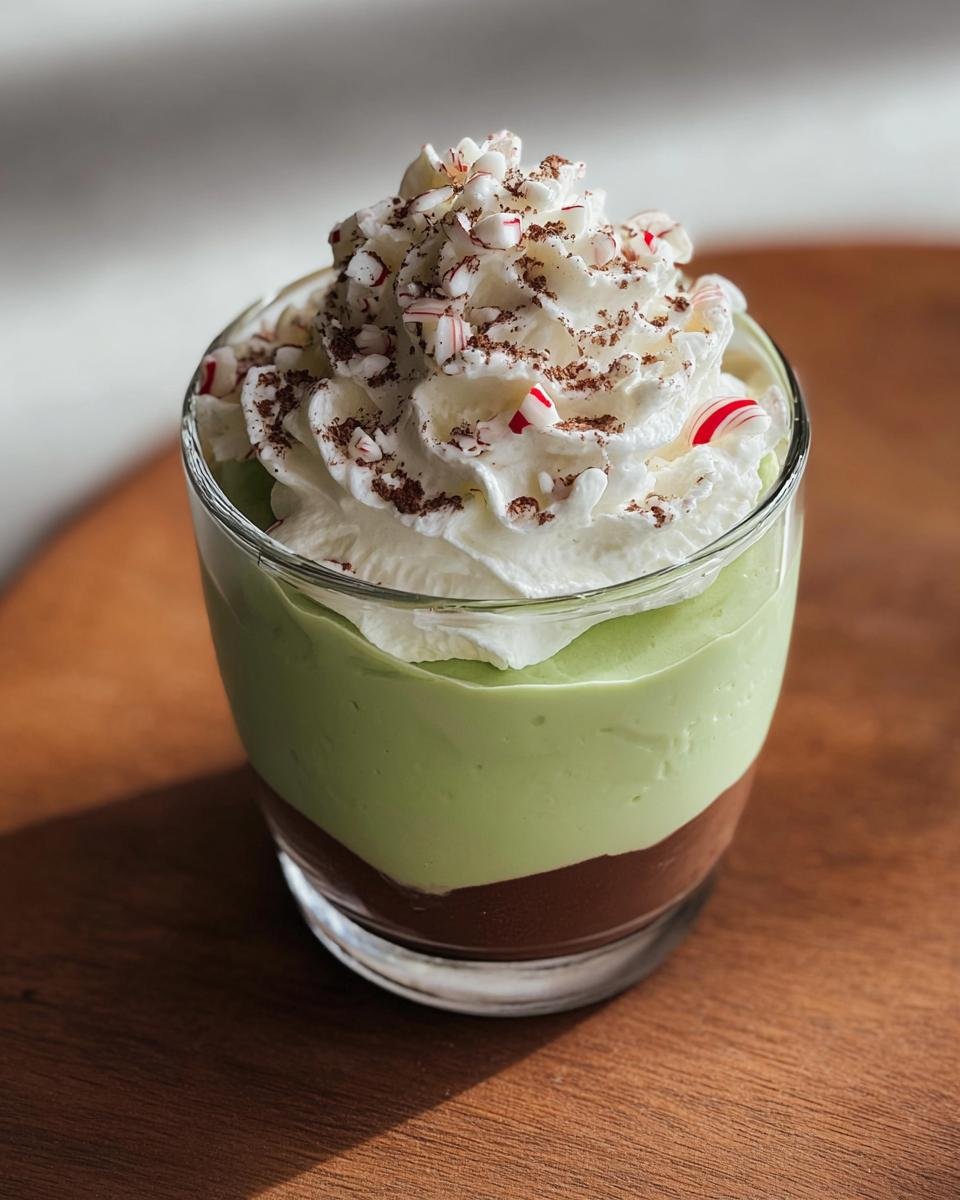
- 1/4 teaspoon of green food coloring (This is my starting point, but feel free to add a drop or two more until you get that perfect, vibrant shamrock green color you’re going for!)
For the Dreamy Topping:
- 1 cup of whipped topping, thawed (Like Cool Whip! Make sure it’s thawed so it’s easy to work with.)
- 1/4 cup of crushed peppermint candies (This is totally optional, but oh-my-goodness, it adds such a fun little crunch and extra minty pop!)
Step-by-Step Guide to Making Shamrock Shake Pudding Cups
Alright, let’s get these festive treats made! It’s super simple, I promise. No fancy baker skills needed here, just a bowl, a whisk, and a little bit of St. Paddy’s Day cheer!
Preparing the Minty Pudding Base
First things first, grab a good-sized mixing bowl. Toss in your instant vanilla pudding mix, your nice, cold milk, and that little splash of peppermint extract. Now, get whisking! You want to whisk it all together until it’s nice and smooth and starting to thicken up a bit. Easy peasy, right?
Achieving the Perfect Shamrock Green
Now for the fun part – making it green! Start by adding about 1/4 teaspoon of green food coloring. Stir it in really well with your whisk or a spatula. See that color? If you want it a bit more vibrant, add another drop or two until you get that perfect, happy shamrock green. Just be careful not to go overboard, or it might start looking a little *too* artificial. You want it to look fresh and festive!
Folding in the Fluffy Topping
To make our pudding extra light and fluffy, we’re going to fold in about half of that thawed whipped topping. Gently swoosh it in with your spatula until it’s just combined. We’re not trying to beat it into submission here – just gently incorporate it. This really lightens up the texture and makes it feel more like a dreamy mousse than just plain pudding.
Assembling Your Shamrock Shake Pudding Cups
Okay, time to put these little beauties together! Grab your cute little glasses or cups – whatever you have on hand will work beautifully! Spoon that gorgeous green pudding mixture evenly into each one. Now, top each cup with the rest of your whipped topping. If you’re feeling fancy (and trust me, you should!), sprinkle those crushed peppermint candies over the top. They add such a delightful little crunch and a burst of cool mintiness. If you’re looking for more fun holiday ideas, definitely check out these holiday desserts!

Chilling for Perfect Set
Almost there! Pop the lid on (or cover them with plastic wrap) and pop them into the fridge for at least 30 minutes. This chilling time is super important so the pudding can set up properly. It makes all the difference between a runny mess and a perfectly set, delightful treat.
Tips for Perfect Shamrock Shake Pudding Cups
Okay, so you’ve got the basics down, but let’s dive into a few little tricks that’ll make your Shamrock Shake Pudding Cups absolutely *chef’s kiss* perfect. We all want that dreamy texture and spot-on flavor, right? Little things can make a big difference! For instance, making sure your milk is super cold is a game-changer for instant pudding – it helps it thicken up just right. And don’t be afraid to taste as you go with the peppermint extract and the food coloring! We’re all aiming for that perfect balance of minty freshness and that iconic green, so play around a bit! If you’re always looking for ways to make life a little easier in the kitchen, you’ll totally dig these easy recipe ideas.
Ingredient Substitutions and Variations
Now, while the recipe as written is fantastic, don’t be afraid to get a little creative! If you can’t find vanilla instant pudding, or just want to switch things up, a cheesecake or even a white chocolate pudding mix can be a fun base to start with. For my dairy-free friends, just swap in your favorite non-dairy milk (almond or oat milk work wonderfully!) and make sure your whipped topping is a plant-based version. Feeling a bit wild? Try folding in some mini chocolate chips along with the whipped topping for a mint-chocolate surprise! Or, instead of crushed peppermint candies, maybe sprinkle on some green sprinkles for extra festive flair!
Serving and Storage
Once your Shamrock Shake Pudding Cups have had their little spa time in the fridge and are perfectly set, they’re ready to be devoured! Serve them up right away for the best texture and that delightful chill. They’re so easy to just grab and go, making them perfect for St. Patrick’s Day parties or a fun dessert surprise. If, by some miracle, you have leftovers – how?! – just pop a lid or some plastic wrap back over them. They’ll keep nicely in the refrigerator for up to 2 days. Just a little tip: the whipped topping might deflate a *tiny* bit after the first day, but they’ll still taste absolutely delicious!

Frequently Asked Questions About Shamrock Shake Pudding Cups
Got questions about these cute little green treats? I’ve got answers! Let’s clear up anything that might be bouncing around in your head.
Can I make these pudding cups ahead of time?
Yes, absolutely! That’s one of the best things about them. You can totally make them a day in advance. Just make sure to cover them well and keep them in the fridge. They need that time to set up anyway, so it’s a perfect make-ahead dessert for your St. Patrick’s Day bash!
What if I don’t have peppermint extract? Can I use mint extract?
Oh goodness, yes! Peppermint and mint extract are pretty interchangeable here. If you use mint extract, it might just give it a slightly different, maybe a little more subtle minty vibe. Just start with the same amount and taste it to see if you want to add a tiny bit more. The key is that hint of minty freshness!
How much food coloring should I really use?
This is totally personal preference! I usually start with about 1/4 teaspoon for that classic, happy shamrock green. But if you love a super vibrant, almost neon green, go ahead and add another drop or two. Just be sure to mix it in really well between additions so you get an even color. Remember, you can always add more, but you can’t take it out!
Can I use a different flavor of instant pudding?
You sure can! While vanilla pudding is awesome because it lets the mint flavor really shine, feel free to get creative. White chocolate or even cheesecake flavored instant pudding would be delicious bases too. Just remember, if you use a flavored pudding, it might change the overall taste profile a bit, but it could be a fun twist!
How do I make these dairy-free?
Making these dairy-free is totally doable, my friend! You’ll need to swap out the regular milk for a dairy-free alternative, like almond milk, soy milk, or oat milk. And make sure your whipped topping is a plant-based version (like coconut-based or soy-based whipped topping). The rest of the ingredients are usually dairy-free, but always double-check your labels just to be sure!
Nutritional Information (Estimated)
Okay, let’s talk numbers! While these Shamrock Shake Pudding Cups are a delightful treat, especially for St. Patrick’s Day, it’s good to have a general idea of what you’re enjoying. Keep in mind that these are just estimates, and the actual nutritional values can change depending on the specific brands of pudding mix, milk, and whipped topping you use. For more details on healthy eating, you can peek at these diet and nutrition tips!

Shamrock Shake Pudding Cups
Ingredients
Equipment
Method
- In a mixing bowl, whisk together the instant vanilla pudding mix, cold milk, and peppermint extract until well combined and slightly thickened.
- Add the green food coloring, starting with 1/4 teaspoon, and stir until you reach your desired shamrock green color. Mix until the color is uniform.
- Gently fold in about half of the whipped topping into the pudding mixture using a spatula until just combined. This will make the pudding lighter and fluffier.
- Spoon the pudding mixture evenly into 6 small glasses or cups.
- Top each pudding cup with the remaining whipped topping.
- If using, sprinkle the crushed peppermint candies over the whipped topping.
- Cover the pudding cups and refrigerate for at least 30 minutes to allow the pudding to set completely.